


The 2025 London Marathon Course Guide - Metric Edition (Kilometers & Meters)
You might laugh, you might frown Walking 'round London town - Lily Allen, LDN

Notes: This guide is based on a Run Ready Certified GPX file, created through a standardized process that combines official course maps, measurement certificates, and other plotting techniques. The official course distance is 42.16 kilometers, which is the shortest possible route while staying within the course boundaries. The certified GPX file measures the course at 42.12 kilometers, so distances in the guide are approximate. Additionally, and as shown below, different platforms will calculate different totals from the same set of coordinates.
This is the Metric Edition (Kilometers & Meters) of the course guide. The Imperial Edition (Miles & Feet) is available here.
Course Overview
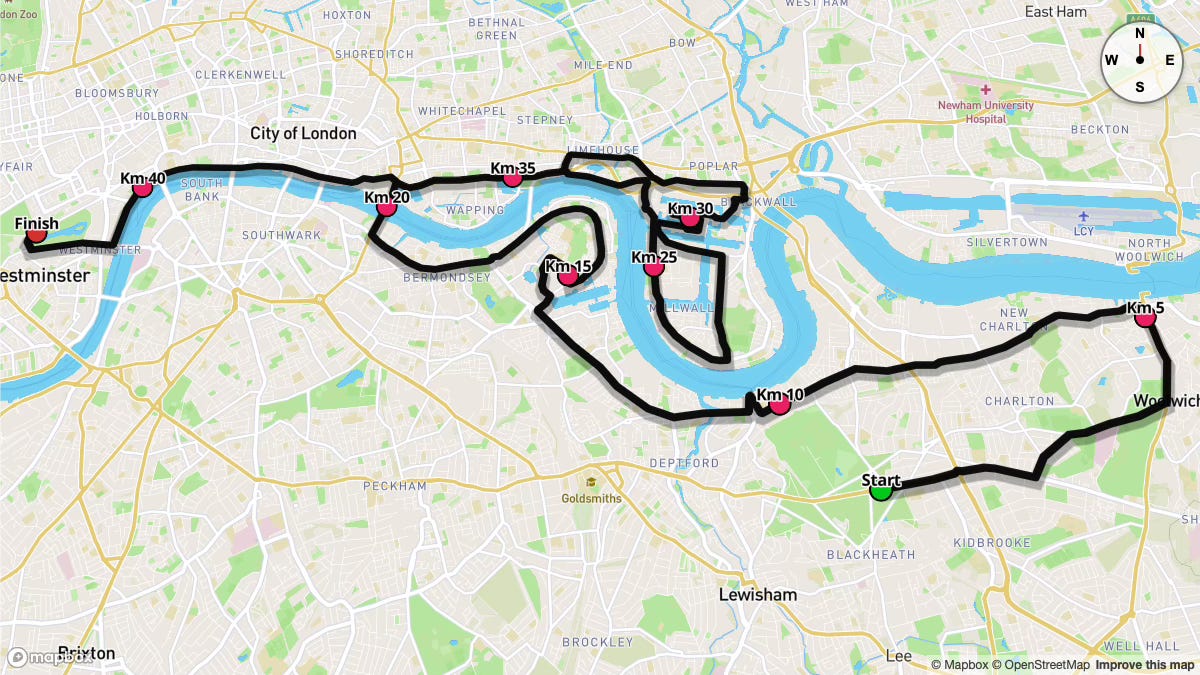
The London Marathon, one of the seven World Marathon Majors, will take place on April 27th, 2025. It is renowned for its memorable route winding through the streets of London, past numerous historic and cultural landmarks, with energetic crowd support helping to carry runners all the way to the finish.
Race day weather in London around late April generally ranges between 9°C and 15°C, with occasional fluctuations up to 21°C. Early morning temperatures can be distinctly cooler, but they tend to rise steadily into the early afternoon.
Due to the large field size, the event features three start lines (Blue, Green, and Red). All three routes converge around KM 3.86 in Woolwich, a point that typically leads to extra congestion. This guide focuses on the Blue Start in southeast London. The elite races and main waves begin from 8:50 a.m. through mid-morning (with the mass event starting at 9:35 a.m.), culminating in a point-to-point journey that finishes near Buckingham Palace.
Key Stats
Event Date: April 27th 2025
Event Type: Road Marathon
Course Length: 42.16 km
Course Type: Point to Point
TrailScore: 36.79
Road Marathon Rating: Easy
Total Ascent: 90.48 meters
Total Descent: 124.55 meters
Longest Uphill:
Starting at KM 0.67, 0.66 km at an average grade of 0.67%
Longest Downhill:
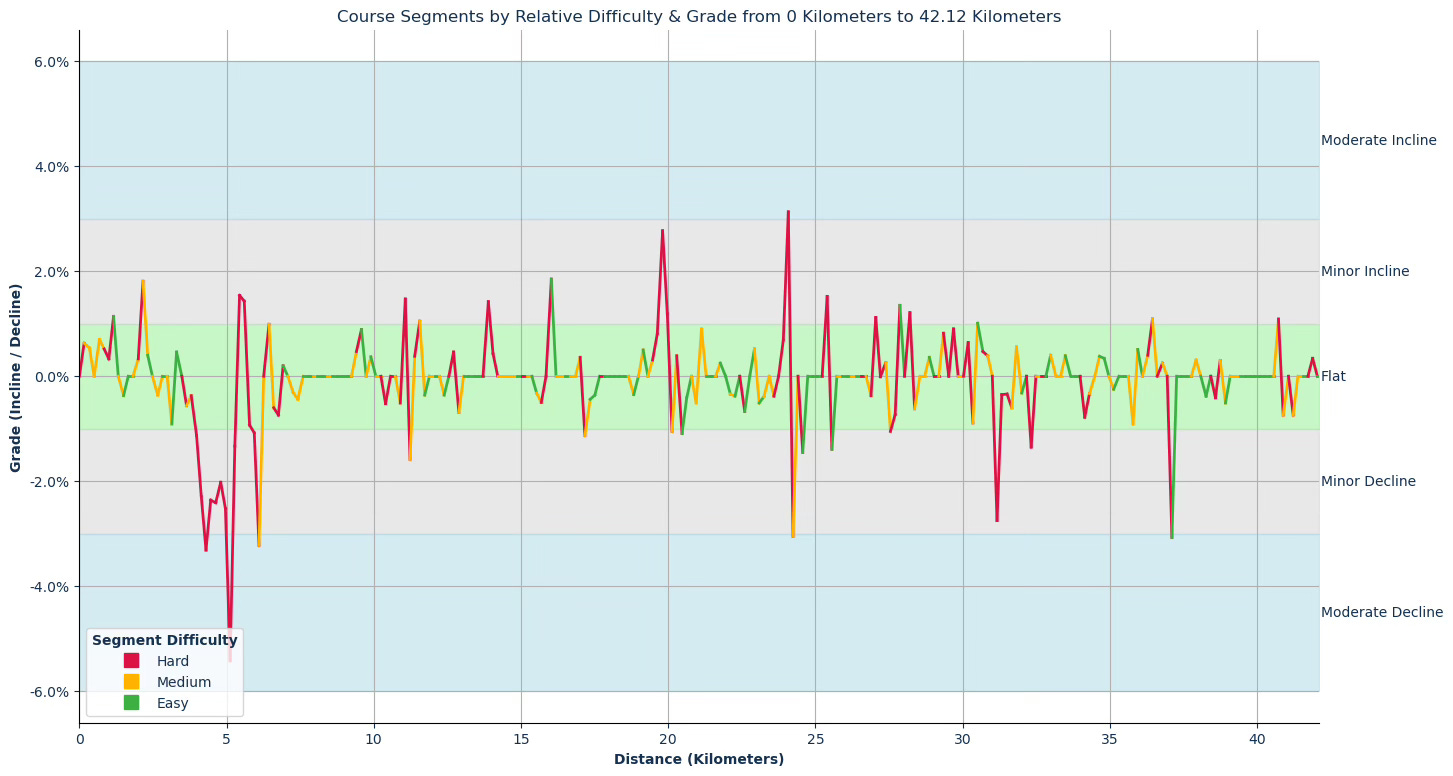
Starting at KM 3.63, 1.81 km at an average grade of -2.15%
Steepest Uphill:
Starting at KM 23.91, 0.33 km at an average grade of 1.91%
Steepest Downhill:
Starting at KM 37.11, 0.17 km at an average grade of -3.07%
Significant Climbs (≥3% grade & ≥0.16 km):
There is 1 significant climb on the course.
Significant Descents (≤-3% grade & ≥0.16 km):
There are a total of 5 significant descents on the course.
Grade Distribution:
Flat: 84.4%
Minor Incline: 6.6%
Minor Decline: 6.6%
Moderate Decline: 2.0%
Moderate Incline: 0.4%
Course Briefing
KM 0-8 (Blue Start Line & Route Convergence)
You'll begin at the Blue Start in southeast London. The opening kilometers gently roll along Shooters Hill Road before descending into Woolwich. Around KM 3.86, you'll merge with runners from the other start lines near the Royal Artillery Barracks. The crowd support is enthusiastic here, and the sudden influx of runners can create congestion. Keep an eye out for Woolwich Common in the distance.
From a terrain perspective, you'll encounter only modest elevation changes, with a more pronounced downhill stretch around KM 4-6. This can help you relax into your rhythm early on, but be cautious—the lively atmosphere may tempt you to push the pace too soon.


Key Challenges
Crowded Merge: Extra congestion near KM 3.86 requires careful attention to footing and pacing.
Early Downhills: Moderate descents before KM 6 can lure you into faster splits—stay controlled to conserve energy.
Significant Climbs (≥3% grade & ≥0.16 km)
None in this section
Significant Descents (≤-3% grade & ≥0.16 km)
Descent #1: KM 4.14 to 4.30, 0.17 km, avg grade -3.31%, total drop 5.5 m
Descent #2: KM 4.96 to 5.12, 0.16 km, avg grade -5.42%, total drop 8.8 m
Descent #3: KM 5.93 to 6.10, 0.17 km, avg grade -3.22%, total drop 5.3 m
Aid Stations
KM 4.8 – Water
Points of Interest
St George's Garrison Church (near KM 4.2) – A historic military church in Woolwich.
Tomb of Tom Cribb (near KM 5.0) – The resting place of a famed English bare-knuckle boxer.
KM 8-16 (Greenwich & Transition Toward Tower Bridge)
As the early hustle settles, you'll run through Greenwich, renowned for its lively crowds—especially around the Cutty Sark. Between KM 10 and 12, the course is primarily flat, making it an ideal zone to lock in your target pace and conserve energy.
Nearing Surrey Quays and Rotherhithe, you might encounter small rollers, though none are particularly taxing. Crowd energy remains high, with supporters often lining the narrower streets to cheer you on. Take in the magnificent city sights, but maintain discipline with your effort throughout this section.


Key Challenges
Crowd Density in Greenwich: Expect concentrated support around the Cutty Sark (KM 10-11). Stay mindful of your pacing and footing.
Subtle Rollers: Slight rises and dips around KM 14-15 can feel tough if you’ve gone out too hard.
Significant Climbs (≥3% grade & ≥0.16 km)
None in this section
Significant Descents (≤-3% grade & ≥0.16 km)
None in this section
Aid Stations
KM 9.7 – Water
KM 11.3 – Lucozade Sport
KM 14.5 – Water
Points of Interest
Cutty Sark (around KM 10.4) – One of the world’s most famous tea clippers, now a maritime museum.
Greenwich Market (around KM 10.5-10.7) – A historic market beloved by both tourists and locals.
KM 16-24 (Crossing Tower Bridge & Heading East)
This section takes you through Bermondsey toward the iconic Tower Bridge crossing around KM 19-20—a major psychological lift. The roaring cheers and the view of the Thames energize weary legs as you cross this London landmark.
After crossing, the route veers east along The Highway, forming an out-and-back where you may spot faster runners heading the opposite direction.
A few minor undulations appear here, but the grade remains mostly moderate. By KM 24, you'll have passed the halfway point. This stretch can feel particularly draining if you started too aggressively, so adhere strictly to your fueling plan and draw strength from the enthusiastic crowd support.


Key Challenges
Tower Bridge Excitement (KM 19-20): The buzz is high—don’t surge prematurely.
The Highway Stretch: Rolling terrain can disrupt your pace if you’re already tired.
Crossing Halfway: Hitting 21 km can be mentally tricky; maintain focus for the second half.
Significant Climbs (≥3% grade & ≥0.16 km)
Climb #1: KM 23.92 to 24.08, 0.17 km, avg grade 3.13%, total gain 5.2 m
Significant Descents (≤-3% grade & ≥0.16 km)
None in this section
Aid Stations
KM 19.3 – Water
KM 22.5 – Lucozade Sport Gels
Points of Interest
Tower Bridge (KM 19-20) – One of London’s most iconic landmarks; crossing it is often a highlight of the race.
Captain James Cook Plaque & Other Historical Markers (KM 22-23) – Various commemorations along The Highway.
KM 24-32 (Canary Wharf Loop & Return West)
Shortly after KM 24, the route bends toward Limehouse and Canary Wharf, an area distinguished by modern skyscrapers and bustling city life. Wind can be a factor here, funneled by tall buildings, so be prepared for inconsistent gusts or sudden calm patches.
Although primarily flat, the course weaves under and around the towering structures, with a few quick inclines and declines.
Mentally, this section is pivotal: you're deep into the second half, yet still have significant distance to go. Continue fueling and maintain positive self-talk, even as fatigue begins to creep in.


Key Challenges
Changing Wind Patterns: Canary Wharf’s tall buildings can alter wind flow and affect rhythm.
Weaving Route: The turns and underpasses can interrupt your momentum if you’re not ready.
Significant Climbs (≥3% grade & ≥0.16 km)
None in this section
Significant Descents (≤-3% grade & ≥0.16 km)
Descent #4: KM 24.08 to 24.24, 0.16 km, avg grade -3.05%, total drop 4.9 m
Aid Stations
KM 24.1 – Lucozade Sport, Water
KM 27.4 – Water
KM 30.6 – Lucozade Sport Gels, Water
Points of Interest
Canary Wharf (KM 29-31) – A modern financial district featuring tall skyscrapers, often brimming with loud spectator support.
Traffic Light Tree (around KM 31.2) – A quirky public art installation near the route.
KM 32-42 (Back to the Embankment & A Finish Near Buckingham Palace)
Leaving Canary Wharf, you'll head back west along the Embankment, passing the Tower of London around KM 36-37. From there, you follow the Thames, approaching landmarks like Big Ben and the Houses of Parliament near KM 40.
The final stretch leads onto Birdcage Walk and The Mall, delivering a memorable finish near Buckingham Palace. These last kilometers can be challenging—your legs will be fatigued, so rely on the cheering crowds and focus on form.
The finishing approach is lined with flags and energetic supporters, a fitting end to your marathon journey.


Key Challenges
Late-Race Fatigue: The final 10 km often feel tough after weaving through Canary Wharf.
Gradual Inclines: Minor ups along the Embankment may still wear you down late in the race.
Significant Climbs (≥3% grade & ≥0.16 km)
None in this section
Significant Descents (≤-3% grade & ≥0.16 km)
Descent #5: KM 36.95 to 37.11, 0.17 km, avg grade -3.07%, total drop 5.2 m
Aid Stations
KM 33.8 – Lucozade Sport, Water
KM 37.0 – Lucozade Sport
KM 38.6 – Water
Points of Interest
Tower of London (KM 36-37) – A historic castle on the north bank of the Thames, dating back to the 11th century.
Big Ben & Houses of Parliament (KM 40-41) – Central symbols of London’s political and cultural heritage.
Buckingham Palace & The Mall (Finish) – A grand, flag-lined approach for your final push, ending just in front of the Palace.