

The 2025 Cocodona 250 Course Guide - Imperial Edition (Miles & Feet)
So, on the path of most resistance Learn to love what you’ve been given - Rob Riccardo, Shine

Note: This is an experimental course guide. I needed a big challenge to test how my systems scaled, and I couldn’t think of something bigger than the Cocodona 250. I’ve included some additional context in the metric version of this guide.
Course Overview
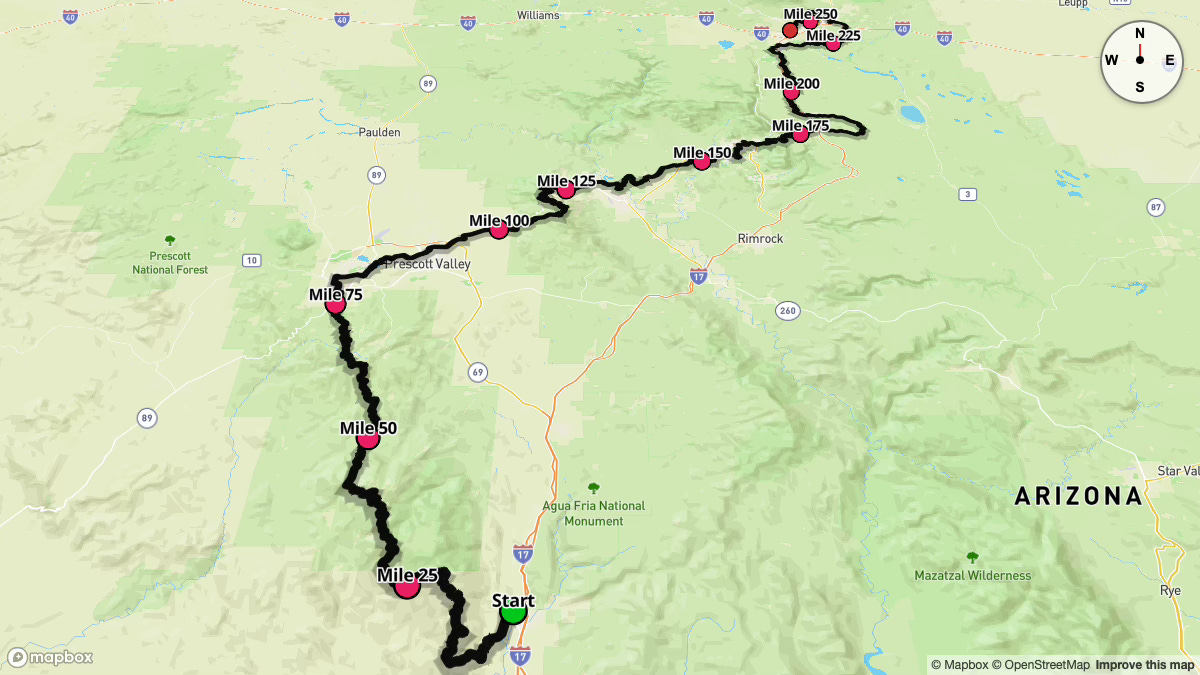
The Cocodona 250 is an iconic point-to-point ultramarathon, renowned for its exceptional diversity and demanding nature. Starting in Black Canyon City, the course stretches 255 miles across Arizona, culminating in Flagstaff. This epic journey traverses a stunning variety of landscapes, from the arid Sonoran Desert at the start, through the rugged Bradshaw Mountains, into the scenic Verde Valley, across Sedona's famed red rock country, and finally ascending to the high-altitude Coconino Plateau.
Starting before dawn at 5:00 a.m., the race immediately challenges runners with a climb out of Deep Canyon Ranch and into the Sonoran Desert. Participants must be prepared for significant temperature variations throughout the race. The early desert and valley sections can be intensely hot during the day, with temperatures potentially reaching the mid-80s°F. In contrast, the higher elevations of the Bradshaw Mountains and Coconino Plateau bring nighttime temperatures plummeting to between 25-40°F. This dramatic temperature swing, combined with the course's diverse terrain, defines the unique challenge of the Cocodona 250.
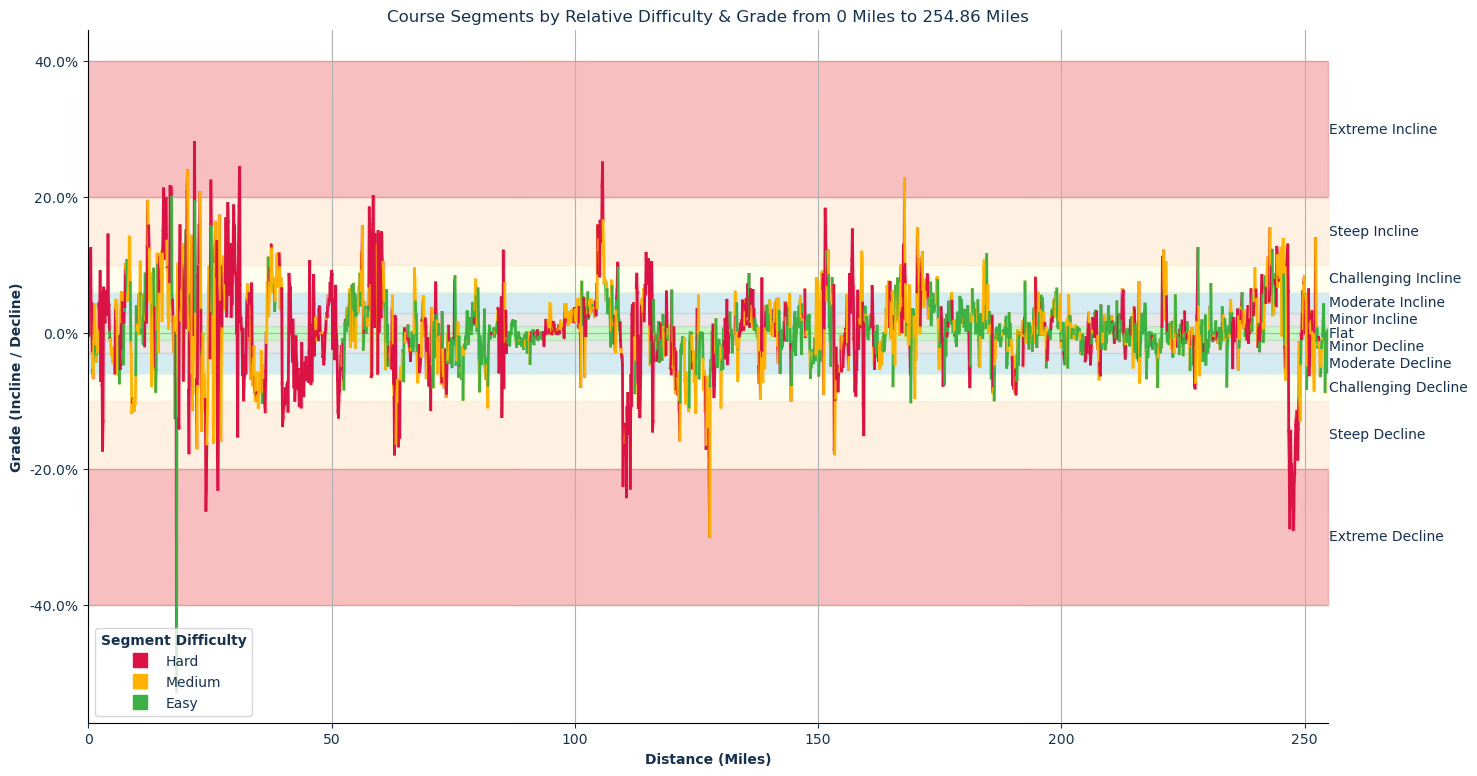
The course is characterized by substantial elevation change, totaling over 36,500 feet of ascent and 31,500 feet of descent. Runners will encounter a wide array of trail surfaces, including smooth double-track, technical single-track, rocky jeep roads, and cross-country sections, demanding versatility and resilience. Navigation will be a key skill throughout the event, particularly in the less defined trail sections and areas with frequent turns.
More than just a race, the Cocodona 250 is an immersive experience through Arizona's rich tapestry of history and ecology. From the ancestral lands of the Yavapai people to historic mining towns and diverse ecosystems, this course promises a transformative and unforgettable adventure.
Key Stats
Event Date: May 5, 2025
Event Type: 250 Mile Ultra Marathon
Course Length: 255.1 miles
Course Type: Point to Point
TrailScore: 669.21
250+ Mile Ultra Marathon Rating: Hard
Total Ascent: 36,570.15 feet
Total Descent: 31,579.33 feet
Longest Uphill:
Starting at Mile 102.35, 5.00 miles at an average grade of 7.10%
Longest Downhill:
Starting at Mile 42.15, 3.32 miles at an average grade of -6.09%
Steepest Uphill:
Starting at Mile 21.81, 0.31 miles at an average grade of 16.64%
Steepest Downhill:
Starting at Mile 18.13, 0.10 miles at an average grade of -52.75%
Significant Climbs (≥3% grade & ≥0.1 miles)
There are a total 248 significant climbs on the course.
Significant Descents (≤-3% grade & ≥0.1 miles):
There are a total 194 significant descents on the course.
Grade Distribution:
Flat: 22.5%
Minor Incline: 15.1%
Moderate Incline: 13.1%
Minor Decline: 12.4%
Moderate Decline: 10.0%
Challenging Incline: 8.7%
Challenging Decline: 7.6%
Steep Incline: 5.4%
Steep Decline: 4.0%
Extreme Decline: 0.6%
Extreme Incline: 0.5%
Course Briefing
Miles 0-7 ( Start & Desert Ascent to Cottonwood Creek Aid Station)
The race begins at Deep Canyon Ranch with a sharp right turn, immediately initiating your ascent onto the famed Black Canyon Trail (BCT). This initial 7-mile section unfolds in the pre-dawn hours, offering a serene introduction to the Sonoran Desert. As you climb, expect to be surrounded by iconic desert flora, including Saguaro cacti and Ocotillos, characteristic of the Black Canyon Trail's single-track.
Around mile 2.4, the course briefly departs from the BCT, transitioning to rolling double-track before an adventurous, short descent into the Slate Creek drainage at mile 3. This drainage, while typically dry in May, presents a rugged, technical challenge with a creek bed scramble, offering a preview of the Bradshaw Mountains' terrain.
Rejoining the BCT single-track at mile 4.2, you'll continue through picturesque desert scenery before a final half-mile on double-track leading to the first aid station at Cottonwood Creek. This opening section is crucial for establishing a sustainable rhythm and proactively managing hydration in the potentially warming desert environment.


Key Challenges
Sustained Initial Climb: The race starts with an immediate and persistent climb, demanding disciplined pacing right from the beginning to conserve energy for the long journey ahead.
Technical Slate Creek Drainage: The descent into and ascent out of Slate Creek drainage involves navigating a dry creek bed, requiring focused footing and scrambling over dry waterfall features early in the race.
Early Heat Management: Even with a 5:00 a.m. start, the Sonoran Desert can heat up rapidly as the sun rises. Managing hydration and body temperature from the start is vital to avoid early setbacks.
Significant Climbs (≥3% grade & ≥0.1 miles)
Climb #1: Mile 0.20 to 0.71, 0.50 mi, avg grade 8.37%, total gain 222.8 ft
Climb #2: Mile 1.22 to 1.32, 0.10 mi, avg grade 4.17%, total gain 22.0 ft
Climb #3: Mile 1.93 to 2.24, 0.31 mi, avg grade 4.15%, total gain 67.5 ft
Climb #4: Mile 2.34 to 2.44, 0.10 mi, avg grade 9.03%, total gain 48.1 ft
Climb #5: Mile 2.54 to 2.64, 0.10 mi, avg grade 5.97%, total gain 31.9 ft
Climb #6: Mile 3.04 to 3.34, 0.30 mi, avg grade 4.68%, total gain 74.5 ft
Climb #7: Mile 3.44 to 3.85, 0.40 mi, avg grade 4.96%, total gain 105.3 ft
Climb #8: Mile 3.95 to 4.25, 0.30 mi, avg grade 7.67%, total gain 122.0 ft
Climb #9: Mile 5.47 to 5.68, 0.20 mi, avg grade 4.30%, total gain 46.2 ft
Climb #10: Mile 5.78 to 5.88, 0.10 mi, avg grade 4.18%, total gain 22.5 ft
Climb #11: Mile 6.69 to 6.80, 0.10 mi, avg grade 5.93%, total gain 32.2 ft
Climb #12: Mile 6.90 to 7.00, 0.10 mi, avg grade 4.47%, total gain 24.5 ft
Significant Descents (≤-3% grade & ≥0.1 miles)
Descent #1: Mile 0.71 to 1.01, 0.31 mi, avg grade -5.00%, total drop 81.1 ft
Descent #2: Mile 1.52 to 1.72, 0.20 mi, avg grade -3.64%, total drop 38.5 ft
Descent #3: Mile 2.44 to 2.54, 0.10 mi, avg grade -7.00%, total drop 37.0 ft
Descent #4: Mile 2.74 to 3.04, 0.30 mi, avg grade -12.65%, total drop 200.9 ft
Descent #5: Mile 4.66 to 4.76, 0.10 mi, avg grade -3.07%, total drop 16.6 ft
Descent #6: Mile 4.86 to 5.07, 0.21 mi, avg grade -4.29%, total drop 46.9 ft
Descent #7: Mile 5.27 to 5.47, 0.20 mi, avg grade -5.57%, total drop 60.2 ft
Descent #8: Mile 5.88 to 6.18, 0.30 mi, avg grade -4.96%, total drop 79.3 ft
Descent #9: Mile 6.29 to 6.39, 0.10 mi, avg grade -7.36%, total drop 39.5 ft
Descent #10: Mile 6.49 to 6.59, 0.10 mi, avg grade -5.22%, total drop 28.6 ft
Aid Stations
Cottonwood Creek Aid Station (Mile 7.4):
Cutoff Time: 5/5/25 9:50 a.m.
Crew Access: No
Pacer Access: No
Drop Bags: No
Gear Check: No
Sleep Station: No
Medic: No
Special Menu: Not Listed
Points of Interest
Deep Canyon Ranch: The starting point of your Cocodona 250 adventure.
Black Canyon Trail: Historic and scenic trail offering quintessential Sonoran Desert views.
Miles 7-32 (Bradshaw Mountain Foothills to Lane Mountain Aid Station)
Leaving Cottonwood Creek, the course embarks on a demanding 25-mile trek towards Lane Mountain, the longest section between aid stations on the course. This segment is characterized by steep, rugged, and hot conditions as you delve into the Bradshaw Mountain foothills.
The terrain is predominantly rocky, comprised of old mining roads and trails covered in loose rocks and ball-bearing gravel, demanding careful footing. Expect a relentless series of steep climbs and descents, embodying a rollercoaster profile that will test your leg muscles and mental fortitude.
Water management is critical in this exposed section. Two water stations are strategically placed at mile 10.4 and mile 24.6, each offering a maximum of 1 liter of water per person. These essential hydration checkpoints should be supplemented with additional water, and filter flasks are recommended as a safety measure, particularly given the potential for extreme heat.
Around mile 28.6, the course sharply turns onto the Lane Mountain Trail, initiating a significant 1,500-foot climb over 2.5 miles. This climb marks a welcome transition as the Sonoran Desert vegetation gradually yields to cooler Ponderosa Pines, offering increasing shade and respite from the heat.
Reaching Lane Mountain Aid Station signifies a major accomplishment, marking the end of a formidable and physically taxing portion of the race.


Key Challenges
Extended Aid Station Spacing: The 25-mile stretch between Cottonwood Creek and Lane Mountain requires meticulous water management and a robust heat strategy, demanding runners to be self-sufficient and prepared for prolonged exposure.
Rugged and Technically Demanding Terrain: Predominantly loose rocks and ball-bearing gravel underfoot necessitate constant focus and increase the risk of slips, falls, and ankle rolls, slowing progress and demanding extra effort.
Steep and Relentless Elevation Changes: This section features rollercoaster terrain with very steep uphill and downhill grades, creating a physically grueling challenge that tests both uphill and downhill running capabilities.
Intense Heat Exposure: The exposed, rocky landscape and Sonoran Desert environment will likely result in intense heat, especially during daylight hours, potentially leading to dehydration and heat exhaustion if not managed effectively.
Significant Climbs (≥3% grade & ≥0.1 miles)
Climb #13: Mile 7.31 to 8.64, 1.33 mi, avg grade 7.86%, total gain 551.4 ft
Climb #14: Mile 9.75 to 9.86, 0.10 mi, avg grade 3.88%, total gain 21.2 ft
Climb #15: Mile 10.26 to 10.37, 0.10 mi, avg grade 5.54%, total gain 29.6 ft
Climb #16: Mile 10.47 to 10.77, 0.31 mi, avg grade 7.34%, total gain 118.9 ft
Climb #17: Mile 10.98 to 11.08, 0.10 mi, avg grade 5.30%, total gain 29.2 ft
Climb #18: Mile 11.29 to 11.49, 0.20 mi, avg grade 5.37%, total gain 57.9 ft
Climb #19: Mile 11.59 to 11.70, 0.10 mi, avg grade 8.66%, total gain 46.2 ft
Climb #20: Mile 11.80 to 11.90, 0.10 mi, avg grade 3.39%, total gain 18.7 ft
Climb #21: Mile 12.00 to 12.82, 0.81 mi, avg grade 11.46%, total gain 492.6 ft
Climb #22: Mile 13.02 to 13.12, 0.10 mi, avg grade 4.13%, total gain 22.3 ft
Climb #23: Mile 13.23 to 13.43, 0.20 mi, avg grade 7.69%, total gain 82.8 ft
Climb #24: Mile 13.53 to 13.63, 0.10 mi, avg grade 3.73%, total gain 20.2 ft
Climb #25: Mile 14.04 to 14.25, 0.21 mi, avg grade 10.81%, total gain 118.3 ft
Climb #26: Mile 14.45 to 15.06, 0.61 mi, avg grade 9.71%, total gain 315.0 ft
Climb #27: Mile 15.16 to 16.30, 1.13 mi, avg grade 15.12%, total gain 905.1 ft
Climb #28: Mile 16.60 to 17.32, 0.72 mi, avg grade 13.83%, total gain 522.8 ft
Climb #29: Mile 18.24 to 18.34, 0.10 mi, avg grade 10.12%, total gain 55.0 ft
Climb #30: Mile 18.64 to 18.85, 0.20 mi, avg grade 12.71%, total gain 137.6 ft
Climb #31: Mile 18.95 to 19.15, 0.20 mi, avg grade 4.85%, total gain 51.9 ft
Climb #32: Mile 19.26 to 19.36, 0.10 mi, avg grade 13.03%, total gain 70.2 ft
Climb #33: Mile 19.56 to 20.07, 0.51 mi, avg grade 10.98%, total gain 296.6 ft
Climb #34: Mile 20.18 to 20.48, 0.31 mi, avg grade 19.80%, total gain 323.1 ft
Climb #35: Mile 20.79 to 20.89, 0.10 mi, avg grade 5.49%, total gain 29.2 ft
Climb #36: Mile 21.10 to 21.20, 0.10 mi, avg grade 14.23%, total gain 78.6 ft
Climb #37: Mile 21.71 to 21.91, 0.20 mi, avg grade 23.72%, total gain 256.6 ft
Climb #38: Mile 22.43 to 23.14, 0.71 mi, avg grade 12.14%, total gain 456.9 ft
Climb #39: Mile 24.58 to 24.89, 0.31 mi, avg grade 8.12%, total gain 132.3 ft
Climb #40: Mile 24.99 to 25.50, 0.51 mi, avg grade 11.43%, total gain 309.5 ft
Climb #41: Mile 25.81 to 26.43, 0.62 mi, avg grade 11.12%, total gain 363.5 ft
Climb #42: Mile 26.83 to 27.14, 0.31 mi, avg grade 9.72%, total gain 157.1 ft
Climb #43: Mile 27.45 to 28.36, 0.92 mi, avg grade 8.72%, total gain 422.5 ft
Climb #44: Mile 28.46 to 29.27, 0.81 mi, avg grade 11.00%, total gain 468.2 ft
Climb #45: Mile 29.37 to 30.38, 1.01 mi, avg grade 10.86%, total gain 577.5 ft
Climb #46: Mile 30.78 to 31.18, 0.40 mi, avg grade 15.79%, total gain 335.4 ft
Significant Descents (≤-3% grade & ≥0.1 miles)
Descent #11: Mile 7.11 to 7.21, 0.10 mi, avg grade -4.58%, total drop 24.2 ft
Descent #12: Mile 8.74 to 9.75, 1.02 mi, avg grade -9.38%, total drop 503.2 ft
Descent #13: Mile 12.92 to 13.02, 0.10 mi, avg grade -7.72%, total drop 41.0 ft
Descent #14: Mile 13.63 to 13.94, 0.30 mi, avg grade -6.48%, total drop 104.1 ft
Descent #15: Mile 17.63 to 17.83, 0.20 mi, avg grade -9.30%, total drop 99.0 ft
Descent #16: Mile 18.03 to 18.14, 0.10 mi, avg grade -52.75%, total drop 289.4 ft
Descent #17: Mile 18.34 to 18.64, 0.30 mi, avg grade -10.50%, total drop 167.9 ft
Descent #18: Mile 19.36 to 19.56, 0.20 mi, avg grade -6.62%, total drop 71.3 ft
Descent #19: Mile 20.48 to 20.69, 0.20 mi, avg grade -13.00%, total drop 139.8 ft
Descent #20: Mile 21.20 to 21.61, 0.40 mi, avg grade -5.99%, total drop 127.2 ft
Descent #21: Mile 22.02 to 22.43, 0.41 mi, avg grade -10.00%, total drop 216.3 ft
Descent #22: Mile 23.14 to 23.35, 0.21 mi, avg grade -8.78%, total drop 95.2 ft
Descent #23: Mile 23.56 to 24.58, 1.02 mi, avg grade -13.01%, total drop 704.3 ft
Descent #24: Mile 24.89 to 24.99, 0.10 mi, avg grade -3.66%, total drop 19.7 ft
Descent #25: Mile 25.60 to 25.81, 0.20 mi, avg grade -14.07%, total drop 152.0 ft
Descent #26: Mile 26.43 to 26.73, 0.30 mi, avg grade -19.12%, total drop 304.7 ft
Descent #27: Mile 27.14 to 27.34, 0.20 mi, avg grade -10.24%, total drop 110.9 ft
Descent #28: Mile 30.58 to 30.68, 0.10 mi, avg grade -15.18%, total drop 81.4 ft
Descent #29: Mile 31.59 to 31.69, 0.10 mi, avg grade -6.15%, total drop 33.0 ft
Descent #30: Mile 31.79 to 32.40, 0.61 mi, avg grade -6.46%, total drop 207.2 ft
Aid Stations
Water Station (Mile 10.4):
Offerings: 1 liter per person only
Water Station (Mile 24.6):
Offerings: 1 liter per person only
Lane Mtn by UltrAspire Aid Station (Mile 32.5):
Cutoff Time: 5/5/25 11:20 p.m.
Crew Access: No
Pacer Access: No
Drop Bags: No
Gear Check: No
Sleep Station: No
Medic: Yes
Special Menu: Watermelon
Points of Interest
Boulder Creek (Mile ~10.7): Anticipate a creek crossing, which is likely to be dry this time of year.
Lane Mountain Trail (Mile ~28.6 onwards): Marks the transition into a cooler Ponderosa Pine forest as you begin the climb to Lane Mountain Aid Station.
Miles 32-36 (Lane Mountain Aid Station to Crown King Aid Station)
The segment from Lane Mountain Aid Station to Crown King is a relatively short, 4-mile section described as a "fairly easy cruise" compared to the preceding challenging miles. The terrain transitions to mostly smooth, double-track dirt road with a predominantly downhill profile.
As you descend, expect cooler temperatures at this higher elevation, and enjoy the pleasant, golden light filtering through the Ponderosa Pines, creating an enjoyable running environment.
The course leads directly into the historic mining town of Crown King, a unique and memorable aid station location. Look out for the "quick left" turn that brings you directly into Crown King and the aid station.
The Crown King Aid Station is located near the iconic Crown King Saloon, the oldest continuously operating saloon in Arizona. This aid station is a significant logistical and psychological milestone, offering the first crew access, drop bag service, and a chance to address any foot care needs before nightfall.


Key Challenges
Foot Care Opportunity: After navigating the rugged terrain of the previous section, take full advantage of the aid station at Crown King to address any foot discomfort or issues proactively before they escalate in the later stages of the race.
Navigational Awareness Approaching Crown King: While generally straightforward, be attentive to a "quick left" turn to ensure you don't miss the turn into Crown King and the aid station, especially if fatigue is setting in.
Significant Climbs (≥3% grade & ≥0.1 miles)
Climb #47: Mile 32.50 to 33.01, 0.51 mi, avg grade 5.42%, total gain 146.5 ft
Climb #48: Mile 33.32 to 33.52, 0.20 mi, avg grade 5.72%, total gain 60.9 ft
Significant Descents (≤-3% grade & ≥0.1 miles)
Descent #31: Mile 33.22 to 33.32, 0.10 mi, avg grade -6.72%, total drop 35.8 ft
Descent #32: Mile 33.62 to 33.92, 0.31 mi, avg grade -5.36%, total drop 86.4 ft
Descent #33: Mile 34.03 to 35.45, 1.42 mi, avg grade -8.29%, total drop 622.5 ft
Descent #34: Mile 35.55 to 36.46, 0.91 mi, avg grade -8.04%, total drop 388.1 ft
Aid Stations
Crown King by Tailwind Aid Station (Mile 36.6):
Cutoff Time: 5/5/25 11:55 p.m.
Crew Access: Yes
Pacer Access: No
Drop Bags: Yes
Gear Check: No
Sleep Station: No
Medic: No
Special Menu: Pulled pork & Black Bean Burgers, Potato/pasta salad, Potato soup, Tailwind slushies
Points of Interest
Crown King (Mile 36.6): A historic mining town, marking the first crew access and drop bag location, and home to Arizona's oldest continuously operating saloon, the Crown King Saloon.
Miles 36-53 (Bradshaw Mountain Traverse to Arrastra Creek Aid Station)
Leaving Crown King Aid Station, the course plunges deeper into the Bradshaw Mountain range. This 16-mile section unfolds entirely on double-track dirt roads, beginning with a gradual climb toward Towers Mountain.
Navigation becomes critical around mile 39.5, where an easily missed "critical left turn" demands your attention to course markings.
Beyond this turn, the route descends toward Senator Highway—despite its name, not actually a highway—then transitions to rolling double-track along a gentle ridgeline. This segment rewards runners with expansive views and potential sunset vistas, creating a memorable experience while offering possibilities for wildlife sightings, including black bears.
As you approach Arrastra Creek Aid Station, nighttime running conditions will set in, requiring cold-weather gear. Crown King includes a mandatory gear check to ensure all runners are properly equipped for the colder night sections ahead.


Key Challenges
Critical Navigation at Mile 39.5: The "critical left turn" at Mile 39.5 is easily overlooked and requires heightened navigational awareness to prevent going off-course in a remote area.
Mandatory Gear Check at Crown King: Before departing Crown King, ensure you have all mandatory gear, as a gear check is enforced. This gear is essential for the significantly colder nighttime conditions in the Bradshaw Mountains.
Nighttime Transition and Temperature Drop: Be prepared for a significant temperature drop as night falls in the Bradshaw Mountains. Ensure you have appropriate layers and headlamp ready as you transition into night running.
Significant Climbs (≥3% grade & ≥0.1 miles)
Climb #49: Mile 36.67 to 36.98, 0.31 mi, avg grade 8.10%, total gain 131.3 ft
Climb #50: Mile 37.08 to 39.74, 2.66 mi, avg grade 8.04%, total gain 1129.5 ft
Climb #51: Mile 41.15 to 41.55, 0.40 mi, avg grade 7.14%, total gain 151.6 ft
Climb #52: Mile 45.37 to 45.47, 0.10 mi, avg grade 10.51%, total gain 55.9 ft
Climb #53: Mile 46.18 to 46.38, 0.20 mi, avg grade 6.41%, total gain 68.2 ft
Climb #54: Mile 47.29 to 47.49, 0.20 mi, avg grade 3.61%, total gain 38.4 ft
Climb #55: Mile 49.10 to 50.11, 1.01 mi, avg grade 6.13%, total gain 327.2 ft
Climb #56: Mile 50.31 to 50.41, 0.10 mi, avg grade 4.88%, total gain 26.1 ft
Climb #57: Mile 50.71 to 50.81, 0.10 mi, avg grade 6.87%, total gain 36.6 ft
Significant Descents (≤-3% grade & ≥0.1 miles)
Descent #35: Mile 39.74 to 41.15, 1.41 mi, avg grade -9.58%, total drop 712.9 ft
Descent #36: Mile 41.85 to 41.95, 0.10 mi, avg grade -4.14%, total drop 21.9 ft
Descent #37: Mile 42.15 to 42.55, 0.40 mi, avg grade -7.52%, total drop 159.6 ft
Descent #38: Mile 42.66 to 43.76, 1.11 mi, avg grade -7.09%, total drop 414.0 ft
Descent #39: Mile 43.86 to 45.27, 1.41 mi, avg grade -6.21%, total drop 462.2 ft
Descent #40: Mile 45.67 to 46.18, 0.50 mi, avg grade -4.84%, total drop 128.7 ft
Descent #41: Mile 46.38 to 46.48, 0.10 mi, avg grade -3.22%, total drop 17.1 ft
Descent #42: Mile 48.09 to 48.49, 0.40 mi, avg grade -3.85%, total drop 81.5 ft
Descent #43: Mile 50.51 to 50.61, 0.10 mi, avg grade -3.80%, total drop 20.3 ft
Descent #44: Mile 51.12 to 51.93, 0.81 mi, avg grade -7.96%, total drop 340.4 ft
Descent #45: Mile 52.03 to 52.13, 0.10 mi, avg grade -4.74%, total drop 25.7 ft
Descent #46: Mile 52.33 to 52.54, 0.20 mi, avg grade -7.70%, total drop 82.6 ft
Aid Stations
Arrastra Creek Aid Station (Mile 53):
Cutoff Time: 5/6/25 7:00 a.m.
Crew Access: No
Pacer Access: No
Drop Bags: No
Gear Check: Yes
Sleep Station: No
Medic: No
Special Menu: Rollups (Turkey/Cheese/Hummus/Avocado), Grilled cheese, Potato soup, Spring rolls
Points of Interest
Towers Mountain (Mile ~39): The course passes near this mountain as you climb out of Crown King, offering views as you ascend.
Senator Highway (Mile ~41 onwards): Enjoy rolling double-track along a ridgeline, potentially providing scenic sunset views as you progress.
Miles 53-69 (Yankee Doodle Climb to Camp Wamatochick Aid Station)
The 16-mile section from Arrastra Creek Aid Station to Camp Wamatochick offers a diverse terrain profile, transitioning from smooth double-track to challenging single-track and requiring careful navigation.
Leaving Arrastra Creek on the smooth double-track of Senator Highway allows for easier running initially. However, the course soon presents a major challenge: the Yankee Doodle Trail. This trail marks the beginning of a demanding 3-mile climb on rough, steep, and loose single-track. The ascent leads towards Mount Union, one of the highest points in the Bradshaw Mountains. As you climb the Yankee Doodle Trail, you may notice evidence of the 2022 Crooks fire.
The demanding climb eventually eases as the trail transitions to more runnable single-track and then dirt roads, leading to a downhill section and Kamp Kipa Aid Station. Upon leaving Kamp Kipa, the course climbs back out, followed by a potentially confusing segment with numerous dirt road intersections and turns, requiring vigilant GPS navigation.
Senator Highway is rejoined for a welcome downhill stretch before a critical right turn onto the Groom Creek Trail, guiding you to Camp Wamatochick Aid Station. This varied section showcases the diverse nature of the Bradshaw Mountains, blending runnable roads with demanding single-track and navigational challenges, especially in the dark.


Key Challenges
Yankee Doodle Climb: A strenuous 3-mile single-track climb on rough and loose terrain will significantly test uphill endurance and mental grit, especially during the night.
Navigation Post-Kamp Kipa: The section immediately after Kamp Kipa is known to be confusing, featuring numerous dirt road intersections and turns that demand careful GPS navigation to stay on course.
Temperature Fluctuations and Nighttime Conditions: Be prepared for cold and dark conditions, particularly at the higher elevations within this section, requiring appropriate layering and headlamp management.
Significant Climbs (≥3% grade & ≥0.1 miles)
Climb #58: Mile 53.05 to 53.15, 0.10 mi, avg grade 3.50%, total gain 18.5 ft
Climb #59: Mile 53.25 to 53.35, 0.10 mi, avg grade 3.64%, total gain 19.8 ft
Climb #60: Mile 53.46 to 53.76, 0.30 mi, avg grade 5.36%, total gain 85.8 ft
Climb #61: Mile 53.97 to 54.17, 0.21 mi, avg grade 6.44%, total gain 70.1 ft
Climb #62: Mile 54.38 to 54.68, 0.30 mi, avg grade 5.46%, total gain 87.5 ft
Climb #63: Mile 54.99 to 55.09, 0.10 mi, avg grade 3.97%, total gain 21.7 ft
Climb #64: Mile 55.19 to 56.42, 1.23 mi, avg grade 7.47%, total gain 485.0 ft
Climb #65: Mile 56.63 to 56.73, 0.10 mi, avg grade 4.44%, total gain 24.0 ft
Climb #66: Mile 56.83 to 56.93, 0.10 mi, avg grade 3.74%, total gain 19.8 ft
Climb #67: Mile 57.13 to 57.24, 0.10 mi, avg grade 3.30%, total gain 18.0 ft
Climb #68: Mile 57.44 to 58.05, 0.61 mi, avg grade 8.98%, total gain 289.6 ft
Climb #69: Mile 58.25 to 58.76, 0.50 mi, avg grade 13.08%, total gain 347.7 ft
Climb #70: Mile 58.86 to 59.37, 0.51 mi, avg grade 10.49%, total gain 282.4 ft
Climb #71: Mile 59.47 to 59.67, 0.20 mi, avg grade 10.83%, total gain 115.3 ft
Climb #72: Mile 59.77 to 60.08, 0.30 mi, avg grade 8.21%, total gain 130.5 ft
Climb #73: Mile 60.18 to 61.00, 0.82 mi, avg grade 7.46%, total gain 322.7 ft
Climb #74: Mile 61.20 to 61.30, 0.10 mi, avg grade 6.25%, total gain 34.4 ft
Climb #75: Mile 62.33 to 62.54, 0.21 mi, avg grade 4.51%, total gain 49.1 ft
Climb #76: Mile 66.93 to 67.24, 0.31 mi, avg grade 7.24%, total gain 117.2 ft
Climb #77: Mile 68.66 to 68.87, 0.21 mi, avg grade 4.90%, total gain 53.2 ft
Significant Descents (≤-3% grade & ≥0.1 miles)
Descent #47: Mile 58.05 to 58.25, 0.20 mi, avg grade -6.30%, total drop 67.6 ft
Descent #48: Mile 59.37 to 59.47, 0.10 mi, avg grade -5.93%, total drop 31.8 ft
Descent #49: Mile 61.00 to 61.10, 0.10 mi, avg grade -5.28%, total drop 28.1 ft
Descent #50: Mile 61.51 to 61.61, 0.10 mi, avg grade -4.77%, total drop 25.9 ft
Descent #51: Mile 61.71 to 62.02, 0.31 mi, avg grade -4.04%, total drop 66.1 ft
Descent #52: Mile 62.12 to 62.33, 0.21 mi, avg grade -5.14%, total drop 55.7 ft
Descent #53: Mile 62.64 to 62.94, 0.30 mi, avg grade -11.69%, total drop 187.9 ft
Descent #54: Mile 63.15 to 64.48, 1.33 mi, avg grade -9.58%, total drop 672.5 ft
Descent #55: Mile 64.68 to 64.79, 0.10 mi, avg grade -7.05%, total drop 38.6 ft
Descent #56: Mile 66.11 to 66.22, 0.10 mi, avg grade -4.06%, total drop 21.7 ft
Descent #57: Mile 67.44 to 67.85, 0.40 mi, avg grade -5.32%, total drop 113.6 ft
Descent #58: Mile 67.95 to 68.45, 0.50 mi, avg grade -4.41%, total drop 117.4 ft
Aid Stations
Kamp Kipa Aid Station (Mile 62.4):
Cutoff Time: 5/6/25 2:00 p.m.
Crew Access: No
Pacer Access: No
Drop Bags: No
Gear Check: No
Sleep Station: Yes - Indoor bunks (Heated space) + limited blankets
Medic: No
Special Menu: Scrambled eggs, egg casserole, tofu, pancakes, bacon
Camp Wamatochick Aid Station (Mile 69):
Cutoff Time: 5/6/25 4:45 p.m.
Crew Access: No
Pacer Access: No
Drop Bags: Yes
Gear Check: No
Sleep Station: Yes - Indoor bunk rooms (Heated space)
Medic: No
Special Menu: Burgers, Soup, Pancakes, bacon
Points of Interest
Yankee Doodle Trail (Mile ~56 onwards): Prepare for a demanding single-track climb, a significant test of uphill strength.
Mount Union (Near Mile ~60): You'll be running near one of the highest points in the Bradshaw Mountains, close to Mount Union.
Groom Creek Trail (Mile ~66.6 onwards): Look forward to beautiful single-track on the Groom Creek Trail, leading towards Camp Wamatochick.
Camp Wamatochick (Mile 69): A welcome aid station offering drop bag access and indoor sleeping, though without crew access.
Miles 69-77 (Prescott Valley Descent to Whiskey Row Aid Station)
Leaving the respite of Camp Wamatochick, this approximately 8-mile section offers a largely downhill cruise towards Prescott and the Whiskey Row Aid Station.
Initially, the course follows dirt roads with numerous turns, requiring careful GPS navigation to stay on route. Senator Highway is rejoined for a smooth, gradual downhill section, offering an opportunity to open up your stride.
The course then transitions back to single-track on the Groom Creek Trail for a pleasant stretch. A series of turns through the residential Friendly Pines community leads back to single-track in the Goldwater Lakes area, renowned for its enjoyable, flowy trails.
The final miles involve pavement running, navigating through Prescott's residential neighborhoods and descending into the heart of the city to the iconic Whiskey Row. This aid station, situated in Prescott's historic square, marks the end of the Bradshaw Mountain traverse and provides significant support, including crew and pacer access, drop bags, and indoor sleeping.


Key Challenges
Navigation Through Turns: Numerous turns, especially in the initial dirt road sections and as you traverse through the Friendly Pines community, necessitate constant vigilance and GPS confirmation to avoid going off course.
Pavement Transition into Whiskey Row: The final 2.5 miles into Whiskey Row are on pavement, which can be physically and mentally taxing on legs after significant trail miles. Prepare for this change of surface and adjust your stride accordingly.
Significant Climbs (≥3% grade & ≥0.1 miles)
Climb #78: Mile 70.48 to 70.58, 0.10 mi, avg grade 3.57%, total gain 19.3 ft
Climb #79: Mile 71.19 to 71.40, 0.20 mi, avg grade 5.19%, total gain 55.7 ft
Climb #80: Mile 72.63 to 72.73, 0.10 mi, avg grade 3.00%, total gain 16.1 ft
Climb #81: Mile 75.18 to 75.38, 0.20 mi, avg grade 8.10%, total gain 87.3 ft
Significant Descents (≤-3% grade & ≥0.1 miles)
Descent #59: Mile 69.37 to 69.47, 0.10 mi, avg grade -6.59%, total drop 34.9 ft
Descent #60: Mile 69.78 to 70.38, 0.61 mi, avg grade -6.22%, total drop 198.9 ft
Descent #61: Mile 70.58 to 70.89, 0.30 mi, avg grade -5.67%, total drop 91.2 ft
Descent #62: Mile 71.09 to 71.19, 0.10 mi, avg grade -3.45%, total drop 18.5 ft
Descent #63: Mile 71.70 to 71.81, 0.10 mi, avg grade -5.90%, total drop 32.2 ft
Descent #64: Mile 72.42 to 72.63, 0.20 mi, avg grade -7.30%, total drop 78.7 ft
Descent #65: Mile 72.83 to 73.34, 0.51 mi, avg grade -6.17%, total drop 165.5 ft
Descent #66: Mile 73.44 to 73.74, 0.31 mi, avg grade -7.54%, total drop 122.3 ft
Descent #67: Mile 73.85 to 73.95, 0.10 mi, avg grade -3.93%, total drop 21.6 ft
Descent #68: Mile 74.26 to 74.37, 0.10 mi, avg grade -4.35%, total drop 23.9 ft
Descent #69: Mile 74.67 to 74.77, 0.10 mi, avg grade -4.98%, total drop 26.7 ft
Descent #70: Mile 75.49 to 75.69, 0.20 mi, avg grade -4.29%, total drop 46.4 ft
Descent #71: Mile 76.00 to 76.10, 0.10 mi, avg grade -6.40%, total drop 34.6 ft
Descent #72: Mile 76.20 to 76.71, 0.51 mi, avg grade -5.64%, total drop 150.5 ft
Descent #73: Mile 76.92 to 77.12, 0.21 mi, avg grade -6.52%, total drop 70.9 ft
Aid Stations
Whiskey Row Aid Station (Mile 77.3):
Cutoff Time: 5/6/25 10:00 p.m.
Crew Access: Yes
Pacer Access: Yes
Drop Bags: Yes
Gear Check: Yes
Sleep Station: Yes - Indoor cots (Heated space)
Medic: Yes
Special Menu: Pizza, soup, Oatmeal
Points of Interest
Groom Creek Trail (Mile ~69-71): Enjoy a beautiful single-track section shortly after leaving Camp Wamatochick.
Friendly Pines Community (Mile ~71-74): Navigate through a residential area with dirt roads and turns, requiring navigational focus.
Goldwater Lakes area (Mile ~74-77): Look forward to fun, flowy single-track trails in the Goldwater Lakes area.
Whiskey Row, Prescott (Mile 77.3): Reach the historic main square of Prescott and the iconic Whiskey Row, location of a major aid station with full services.
Miles 77-90 (Granite Dells & Peavine Trail to Iron King Aid Station)
Departing the vibrant Whiskey Row Aid Station, this section transitions from city streets into the natural beauty of Prescott's Granite Dells and the Peavine Trail.
The initial miles unfold on sidewalks and surface streets before entering the Watson Woods Preserve and the Granite Creek riparian area. The course then merges onto the Peavine Trail, skirting Watson Lake and traversing directly into the Granite Dells.
This section is characterized by increasingly technical terrain, including granite slickrock, boulder hopping, and scrambling, demanding agility and careful footing. Navigation through the Granite Dells can be challenging, requiring close attention to course markings, especially around Watson Lake.
Exiting the Granite Dells, the course rejoins the Peavine Trail for an easier 4-mile downhill stretch on crushed granite, leading directly to Iron King Aid Station. This section is significant as it marks the first point where pacers are permitted to join runners.


Key Challenges
Navigation in Granite Dells: The Granite Dells section, particularly around Watson Lake, demands careful navigation due to the complex network of trails and the need to closely follow course markings to avoid getting lost.
Technical Terrain in Granite Dells: Expect highly technical terrain within the Granite Dells, including granite slickrock, boulder hopping, and scrambling, requiring agility, sure-footedness, and a change of pace from previous sections.
Surface Transition: Be prepared for a rapid transition from pavement running in Prescott to technical trail running in the Granite Dells, requiring a shift in focus and running style to adapt to the varied surfaces.
Significant Climbs (≥3% grade & ≥0.1 miles)
Climb #82: Mile 77.74 to 77.95, 0.20 mi, avg grade 3.10%, total gain 33.2 ft
Climb #83: Mile 78.86 to 79.07, 0.21 mi, avg grade 3.79%, total gain 41.5 ft
Climb #84: Mile 79.38 to 79.69, 0.31 mi, avg grade 5.54%, total gain 89.6 ft
Climb #85: Mile 79.99 to 80.10, 0.10 mi, avg grade 6.50%, total gain 35.9 ft
Climb #86: Mile 81.33 to 81.43, 0.10 mi, avg grade 3.37%, total gain 18.0 ft
Climb #87: Mile 84.08 to 84.29, 0.20 mi, avg grade 3.54%, total gain 38.1 ft
Climb #88: Mile 84.79 to 84.89, 0.10 mi, avg grade 5.16%, total gain 27.4 ft
Climb #89: Mile 85.20 to 85.30, 0.10 mi, avg grade 12.05%, total gain 64.6 ft
Climb #90: Mile 85.40 to 85.60, 0.20 mi, avg grade 6.77%, total gain 72.0 ft
Climb #91: Mile 85.70 to 85.80, 0.10 mi, avg grade 3.20%, total gain 17.0 ft
Significant Descents (≤-3% grade & ≥0.1 miles)
Descent #74: Mile 80.20 to 80.41, 0.21 mi, avg grade -6.32%, total drop 69.0 ft
Descent #75: Mile 80.61 to 80.92, 0.31 mi, avg grade -3.88%, total drop 62.7 ft
Descent #76: Mile 81.43 to 82.15, 0.72 mi, avg grade -6.41%, total drop 242.6 ft
Descent #77: Mile 84.29 to 84.49, 0.20 mi, avg grade -5.20%, total drop 55.2 ft
Descent #78: Mile 84.89 to 85.20, 0.30 mi, avg grade -9.19%, total drop 146.6 ft
Descent #79: Mile 85.30 to 85.40, 0.10 mi, avg grade -8.00%, total drop 42.9 ft
Aid Stations
Iron King Aid Station (Mile 90.7):
Cutoff Time: 5/7/25 3:30 a.m.
Crew Access: Yes
Pacer Access: Yes
Drop Bags: No
Gear Check: No
Sleep Station: No
Medic: Yes
Special Menu: Mashed potato bar w/ sloppy joe topping, tomato soup, oatmeal
Points of Interest
Whiskey Row: Depart from the historic Prescott district and Whiskey Row.
Watson Woods Preserve:** (Mile ~82) Enter the Watson Woods Preserve, a riparian area and nature preserve, offering a change of scenery.
Granite Creek:** (Mile ~82) Cross Granite Creek within Watson Woods Preserve.
Peavine Trail:** (Mile ~82 onwards) Join the Peavine Trail, a former rail line converted to a cinder path, offering easier running.
Watson Lake:** (Mile ~83 onwards) Pass by scenic Watson Lake within the Granite Dells.
Granite Dells:** (Mile ~83-90) Immerse yourself in the unique granite rock formations of the Granite Dells, a technical and visually stunning trail section.
Miles 90-95 (Fain Ranch Cross-Country to Fain Ranch Aid Station)
The relatively short, flat section from Iron King Aid Station to Fain Ranch Aid Station offers a change of pace but introduces a unique element: cross-country travel.
Leaving Iron King on sidewalks and dirt roads, the course soon transitions onto Fain Ranch land via A-frame ladders over barbed wire fences. For approximately 1.5 miles, runners navigate cross-country through high desert grasslands and uneven terrain, demanding strong navigational skills as defined trails vanish.
This section is known for its population of Pronghorn Antelope, providing potential wildlife viewing opportunities. The final stretch continues with more cross-country travel before reaching the Fain Ranch Aid Station at the Arizona Downs Racetrack.
Due to the faint trails and cross-country nature of this section, navigation skills and reliance on GPS are essential.


Key Challenges
Cross-Country Navigation Required: Approximately 1.5 miles of cross-country travel without defined trails demands strong navigation skills and the ability to rely on GPS to stay on course across open ranch land.
Uneven Cross-Country Terrain: Uneven dirt and grasses in the cross-country sections can be physically demanding, increasing the risk of ankle rolls and requiring careful foot placement.
Barbed Wire Fence Crossings: Multiple A-frame ladder crossings over barbed wire fences will be encountered, requiring careful maneuvering and potentially slowing progress as you navigate these obstacles.
Significant Climbs (≥3% grade & ≥0.1 miles)
Climb #92: Mile 94.77 to 94.87, 0.10 mi, avg grade 4.30%, total gain 22.9 ft
Climb #93: Mile 94.97 to 95.07, 0.10 mi, avg grade 3.66%, total gain 19.5 ft
Significant Descents (≤-3% grade & ≥0.1 miles)
Descent #80: Mile 90.69 to 90.79, 0.10 mi, avg grade -4.50%, total drop 23.8 ft
Aid Stations
Fain Ranch by Satisfy Aid Station (Mile 95.9):
Cutoff Time: 5/7/25 6:00 a.m.
Crew Access: Yes
Pacer Access: Yes
Drop Bags: Yes
Gear Check: Yes
Sleep Station: No
Medic: Yes
Special Menu: Potatoes/veggies/chicken, french toast, pancakes, cookies
Points of Interest
Fain Ranch Land (Mile ~91 onwards): Traverse through high desert grassland and ranch land, known to be habitat for Pronghorn Antelope.
Arizona Downs Racetrack (Mile 95.9): The Fain Ranch Aid Station is uniquely located at the Arizona Downs Racetrack.
Miles 95-108 (Black Hills Ascent to Mingus Mountain Camp Aid Station)
The section from Fain Ranch Aid Station to Mingus Mountain Camp Aid Station is described as "difficult," initiating a significant and sustained climb into the Black Hills.
Leaving Fain Ranch, the course immediately requires crossing another A-frame ladder before joining a faint double-track road. Rough cross-country travel persists early in this section, again emphasizing the need for proficient navigation skills.
The course then improves, transitioning to a well-graded dirt road and eventually evolving into "very nice single-track" as you ascend into the Black Hills. Noticeable vegetation changes occur as elevation increases, shifting to pine, juniper, and pinon trees.
A "worthy 2-mile climb" featuring switchbacks marks the steepest and most sustained portion of the ascent. Reaching Mingus Mountain Camp Aid Station is a welcome reward after a challenging climb, offering hot showers and indoor sleeping facilities.
A mandatory gear check upon leaving Fain Ranch Aid Station ensures runners are prepared for the anticipated significant temperature drop at higher elevations.


Key Challenges
Continued Cross-Country Travel: Rough cross-country travel at the beginning of this section requires ongoing navigational vigilance, especially after leaving the aid station.
Substantial Mingus Mountain Climb: A significant and sustained climb to Mingus Mountain Camp, including a steep 2-mile section with switchbacks, will test your climbing legs and overall endurance.
Significant Temperature Drop Expected: Be prepared for a considerable temperature drop as you ascend Mingus Mountain, transitioning from potentially warmer temperatures in Prescott Valley to significantly colder conditions at higher elevations, particularly as night approaches.
Significant Climbs (≥3% grade & ≥0.1 miles)
Climb #94: Mile 97.90 to 98.00, 0.10 mi, avg grade 4.17%, total gain 22.3 ft
Climb #95: Mile 98.10 to 98.30, 0.20 mi, avg grade 3.64%, total gain 38.9 ft
Climb #96: Mile 98.70 to 98.80, 0.10 mi, avg grade 3.01%, total gain 16.1 ft
Climb #97: Mile 99.21 to 99.41, 0.20 mi, avg grade 3.20%, total gain 33.9 ft
Climb #98: Mile 99.51 to 99.61, 0.10 mi, avg grade 3.42%, total gain 18.1 ft
Climb #99: Mile 99.81 to 100.01, 0.20 mi, avg grade 3.44%, total gain 36.6 ft
Climb #100: Mile 100.12 to 100.32, 0.20 mi, avg grade 3.23%, total gain 34.2 ft
Climb #101: Mile 100.42 to 100.62, 0.20 mi, avg grade 4.04%, total gain 42.9 ft
Climb #102: Mile 100.82 to 100.92, 0.10 mi, avg grade 3.74%, total gain 20.1 ft
Climb #103: Mile 101.23 to 101.43, 0.21 mi, avg grade 6.58%, total gain 71.5 ft
Climb #104: Mile 101.54 to 101.64, 0.10 mi, avg grade 5.26%, total gain 28.0 ft
Climb #105: Mile 101.74 to 101.84, 0.10 mi, avg grade 5.09%, total gain 26.9 ft
Climb #106: Mile 102.24 to 102.34, 0.10 mi, avg grade 3.64%, total gain 19.4 ft
Climb #107: Mile 102.55 to 102.65, 0.10 mi, avg grade 5.90%, total gain 31.4 ft
Climb #108: Mile 102.85 to 103.05, 0.20 mi, avg grade 4.22%, total gain 44.9 ft
Climb #109: Mile 103.16 to 103.96, 0.81 mi, avg grade 3.78%, total gain 161.2 ft
Climb #110: Mile 104.06 to 104.27, 0.20 mi, avg grade 4.34%, total gain 46.2 ft
Climb #111: Mile 104.37 to 106.63, 2.26 mi, avg grade 11.40%, total gain 1360.4 ft
Climb #112: Mile 106.73 to 107.14, 0.41 mi, avg grade 4.06%, total gain 88.4 ft
Climb #113: Mile 107.45 to 107.66, 0.20 mi, avg grade 7.25%, total gain 77.9 ft
Significant Descents (≤-3% grade & ≥0.1 miles)
Descent #81: Mile 101.12 to 101.23, 0.10 mi, avg grade -7.88%, total drop 42.1 ft
Descent #82: Mile 101.94 to 102.04, 0.10 mi, avg grade -6.37%, total drop 33.9 ft
Aid Stations
Mingus Mountain Camp Aid Station (Mile 108.3):
Cutoff Time: 5/7/25 1:00 p.m.
Crew Access: Yes
Pacer Access: Yes
Drop Bags: Yes
Gear Check: Yes
Sleep Station: Yes - Indoor bunks (Heated space)
Medic: No
Special Menu: Lasagna, Salad, pasta bake, Bread, Pancakes
Points of Interest
Black Hills Mile ~95 onwards): Begin your ascent into the Black Hills mountain range, separating Prescott Valley from the Verde Valley.
Mingus Mountain: (Mile 108.3): Reach the summit area of Mingus Mountain and Mingus Mountain Camp Aid Station, offering hot showers and indoor sleeping.
Miles 108-125 (Mingus Mountain Descent to Jerome Historic State Park Aid Station)
Departing Mingus Mountain Camp Aid Station, runners are treated to spectacular panoramic views across the Verde Valley towards Sedona and Flagstaff. The initial miles trace the cliff edge before the North Mingus Trail initiates a technical descent.
This descent is notably technical for the first mile, requiring focused footing and careful navigation, before transitioning to a gentler grade on an old roadbed. The course crosses Hwy 89A cautiously, marking a transition in vegetation from pines to scrub oak and sage, opening up expansive views of the Verde Mine and Verde Valley.
The terrain in this section is generally rocky, particularly on dirt roads, which can be tiring on the feet. Eventually, the course passes the historic Verde Mine and descends into Jerome, a unique and historic mining town perched dramatically on the mountainside.
Runners will traverse directly through Jerome, experiencing its unique atmosphere and sweeping vistas, before reaching the aid station located with panoramic views overlooking the Verde Valley, Sedona, and the distant Flagstaff peaks. Jerome Historic State Park Aid Station marks a significant psychological milestone, signaling the halfway point of the Cocodona 250.


Key Challenges
Technical Descent on North Mingus Trail: The initial descent off Mingus Mountain via the North Mingus Trail is technically demanding for approximately a mile, requiring careful footing and attention to the trail surface.
Sustained Rocky Terrain: Expect consistently rocky surfaces, particularly on the dirt roads within this section, which can contribute to foot fatigue over time.
Navigating Jerome Town: While running through the historic town of Jerome, be mindful of pedestrians and vehicles. Adhere to permit requirements by staying on sidewalks within the town.
Significant Climbs (≥3% grade & ≥0.1 miles)
Climb #114: Mile 108.37 to 108.88, 0.51 mi, avg grade 6.98%, total gain 187.5 ft
Climb #115: Mile 111.72 to 111.82, 0.10 mi, avg grade 4.00%, total gain 21.3 ft
Climb #116: Mile 112.02 to 112.12, 0.10 mi, avg grade 4.32%, total gain 22.9 ft
Climb #117: Mile 112.53 to 112.83, 0.30 mi, avg grade 7.09%, total gain 113.1 ft
Climb #118: Mile 113.54 to 113.84, 0.30 mi, avg grade 4.70%, total gain 74.6 ft
Climb #119: Mile 113.94 to 114.15, 0.20 mi, avg grade 4.80%, total gain 51.3 ft
Climb #120: Mile 114.25 to 115.26, 1.01 mi, avg grade 8.36%, total gain 446.3 ft
Climb #121: Mile 115.67 to 115.87, 0.20 mi, avg grade 7.98%, total gain 84.7 ft
Climb #122: Mile 116.07 to 116.17, 0.10 mi, avg grade 4.76%, total gain 25.6 ft
Climb #123: Mile 118.72 to 118.82, 0.10 mi, avg grade 6.02%, total gain 31.9 ft
Climb #124: Mile 119.83 to 119.93, 0.10 mi, avg grade 6.17%, total gain 33.2 ft
Significant Descents (≤-3% grade & ≥0.1 miles)
Descent #83: Mile 109.49 to 111.62, 2.13 mi, avg grade -13.45%, total drop 1509.4 ft
Descent #84: Mile 112.22 to 112.32, 0.10 mi, avg grade -8.82%, total drop 46.8 ft
Descent #85: Mile 112.42 to 112.53, 0.10 mi, avg grade -3.88%, total drop 20.8 ft
Descent #86: Mile 112.83 to 113.04, 0.21 mi, avg grade -9.25%, total drop 100.8 ft
Descent #87: Mile 113.14 to 113.54, 0.41 mi, avg grade -8.12%, total drop 173.9 ft
Descent #88: Mile 115.36 to 115.57, 0.20 mi, avg grade -4.50%, total drop 48.7 ft
Descent #89: Mile 115.87 to 116.07, 0.20 mi, avg grade -13.74%, total drop 146.7 ft
Descent #90: Mile 116.48 to 116.58, 0.10 mi, avg grade -4.02%, total drop 21.3 ft
Descent #91: Mile 116.78 to 116.88, 0.10 mi, avg grade -4.02%, total drop 21.8 ft
Descent #92: Mile 117.29 to 117.39, 0.10 mi, avg grade -4.20%, total drop 22.4 ft
Descent #93: Mile 117.70 to 117.91, 0.21 mi, avg grade -3.81%, total drop 41.4 ft
Descent #94: Mile 118.31 to 118.41, 0.10 mi, avg grade -3.34%, total drop 18.5 ft
Descent #95: Mile 118.62 to 118.72, 0.10 mi, avg grade -3.18%, total drop 17.1 ft
Descent #96: Mile 119.53 to 119.83, 0.30 mi, avg grade -5.05%, total drop 81.1 ft
Descent #97: Mile 120.04 to 120.24, 0.20 mi, avg grade -5.00%, total drop 53.5 ft
Descent #98: Mile 120.34 to 120.44, 0.10 mi, avg grade -4.68%, total drop 24.8 ft
Descent #99: Mile 120.54 to 120.65, 0.10 mi, avg grade -8.75%, total drop 46.8 ft
Descent #100: Mile 120.75 to 121.67, 0.92 mi, avg grade -9.36%, total drop 453.7 ft
Descent #101: Mile 122.48 to 123.50, 1.02 mi, avg grade -8.69%, total drop 467.5 ft
Descent #102: Mile 124.01 to 124.11, 0.10 mi, avg grade -5.16%, total drop 27.4 ft
Descent #103: Mile 124.21 to 124.31, 0.10 mi, avg grade -4.07%, total drop 22.2 ft
Descent #104: Mile 124.42 to 124.93, 0.52 mi, avg grade -7.49%, total drop 203.6 ft
Aid Stations
Jerome Historic State Park Aid Station (Mile 125.3):
Cutoff Time: 5/7/25 8:30 p.m.
Crew Access: Yes
Pacer Access: Yes
Drop Bags: No
Gear Check: No
Sleep Station: No
Medic: Yes
Special Menu: Chicken tacos, pancakes
Points of Interest
Mingus Mountain Summit Views: (Mile ~108-109): Enjoy spectacular panoramic views from the summit area of Mingus Mountain, encompassing the Verde Valley, Sedona, and Flagstaff.
North Mingus Trail (Mile ~109 onwards): Experience a technical descent off Mingus Mountain, requiring focused trail running.
Verde Mine (Mile ~120 onwards): Pass by the historic Verde Mine, a visible landmark offering a glimpse into the area's mining history.
Jerome Historic State Park (Mile 125.3): The aid station is located within the historic mining town of Jerome, offering a unique and atmospheric stop.
Jerome (Mile ~123-125): Run directly through the historic mining town of Jerome, now an artist enclave and tourist destination, offering a unique mid-race experience.
Miles 125-134 (Verde Valley Descent to Dead Horse Ranch Aid Station)
This approximately 9-mile section marks a significant psychological transition, moving from the first half of the Cocodona 250 into the second half.
Leaving Jerome Historic State Park Aid Station, the course begins with a very steep descent via a rough dirt road, dropping approximately 1,000 feet in just a mile. Multiple gates along this descent require runners to stop and close them, a frequent occurrence in this section.
The route continues through private property to access Bitter Creek Wash. After a brief climb out of the wash, the course passes through Clarkdale's main square before transitioning onto an old railroad grade, now a cinder path.
This path eventually becomes single-track, running alongside the scenic Verde River. A notable feature is the Verde River crossing, requiring runners to wade through knee-deep water, offering a refreshing cool-down.
Emerging from the river, the course winds through cottonwoods and lush vegetation before arriving at Dead Horse Ranch State Park and the welcoming aid station. Be prepared for daytime heat in the Verde Valley, with temperatures expected to reach the mid-80s°F.


Key Challenges
Very Steep Descent from Jerome: The initial 1,000-foot descent from Jerome is extremely steep and on a loose, rough dirt road, demanding controlled and careful downhill running technique to avoid injury.
Verde River Crossing: Wading through the Verde River, while potentially refreshing, will fully submerge feet and shoes. Plan accordingly with sock choice and foot care strategies to mitigate potential issues from wet feet.
Frequent Gates: Multiple gates along the course in this section will require stopping to open and close them, potentially disrupting running rhythm and flow.
Verde Valley Heat Exposure: Expect daytime heat in the Verde Valley, especially during the river crossing and approach to Dead Horse Ranch Aid Station, requiring continued attention to hydration and heat management.
Significant Climbs (≥3% grade & ≥0.1 miles)
Climb #125: Mile 125.03 to 125.13, 0.10 mi, avg grade 3.48%, total gain 18.5 ft
Climb #126: Mile 125.34 to 125.44, 0.10 mi, avg grade 5.45%, total gain 28.9 ft
Climb #127: Mile 131.15 to 131.25, 0.10 mi, avg grade 4.80%, total gain 25.5 ft
Climb #128: Mile 132.87 to 132.97, 0.10 mi, avg grade 6.01%, total gain 32.5 ft
Climb #129: Mile 133.17 to 133.27, 0.10 mi, avg grade 4.30%, total gain 22.8 ft
Significant Descents (≤-3% grade & ≥0.1 miles)
Descent #105: Mile 125.13 to 125.24, 0.10 mi, avg grade -3.42%, total drop 18.5 ft
Descent #106: Mile 125.44 to 125.54, 0.10 mi, avg grade -6.64%, total drop 35.1 ft
Descent #107: Mile 126.26 to 128.10, 1.84 mi, avg grade -10.75%, total drop 1043.2 ft
Descent #108: Mile 128.40 to 128.80, 0.40 mi, avg grade -7.26%, total drop 153.8 ft
Descent #109: Mile 129.01 to 129.11, 0.10 mi, avg grade -4.48%, total drop 24.6 ft
Descent #110: Mile 129.21 to 129.51, 0.30 mi, avg grade -4.29%, total drop 68.5 ft
Descent #111: Mile 129.93 to 130.44, 0.51 mi, avg grade -5.95%, total drop 161.2 ft
Descent #112: Mile 130.85 to 130.95, 0.10 mi, avg grade -3.68%, total drop 19.8 ft
Descent #113: Mile 131.25 to 131.35, 0.10 mi, avg grade -4.48%, total drop 23.7 ft
Descent #114: Mile 133.37 to 133.47, 0.10 mi, avg grade -6.99%, total drop 37.2 ft
Aid Stations
Dead Horse Ranch Aid Station (Mile 134.0):
Cutoff Time: 5/8/25 12:00 a.m.
Crew Access: Yes
Pacer Access: Yes
Drop Bags: Yes
Gear Check: No
Sleep Station: No - Individual sleeper tent
Medic: Yes
Special Menu: Burritos, potato soup, oatmeal
Points of Interest
Verde River (Mile ~133): Experience a unique Verde River crossing, expect knee-deep water for a refreshing mid-race experience.
Tuzigoot Pueblo (Mile ~133): Look for the ancient Tuzigoot Pueblo ruins visible from the Verde River area, a testament to the region's history.
Dead Horse Ranch State Park (Mile 134): Arrive at Dead Horse Ranch State Park and the aid station, a welcome stop after the Verde Valley crossing.
Miles 134-147 (Rocky Raptor & Lime Kiln Trails to Deer Pass Aid Station)
Leaving Dead Horse Ranch Aid Station, the course immediately transitions to the Lower Raptor trail, known for its characteristically chunky, rocky single-track. This section traverses Arizona Primrose habitat, designated as a "NO PASSING ZONE" to protect this endangered plant species. Please adhere to this request to minimize impact.
After approximately 4 miles of rocky single-track on Lower Raptor and Thumper trails, the course merges onto the Lime Kiln Trail, marking the end of the "no passing zone" and the beginning of an extended and highly anticipated stretch of high-quality single-track.
Lime Kiln Trail leads directly to Deer Pass Aid Station, offering increasingly impressive red rock vistas as you approach Sedona. Near mile 146, the course briefly uses a road section and a culvert crossing under Hwy 89A before arriving at Deer Pass Aid Station. This section is defined by technical, rocky single-track and the growing excitement of entering Sedona's famed red rock country.


Key Challenges
Chunky Rocky Terrain on Lower Raptor Trail: The initial 4 miles on Lower Raptor Trail are characterized by very rocky terrain, with "baby-head" sized rocks, demanding precise footwork and potentially increasing leg fatigue.
No Passing Zone on Lower Raptor Trail: Strict adherence to the "no passing zone" on the Lower Raptor Trail is required to protect the endangered Arizona Primrose, potentially impacting race strategy and pacing.
Fine Dust Trail Surface: The trail surface from Dead Horse Ranch to Sedona can be very fine dust, which can contribute to foot issues and require attention to foot care to prevent blisters and discomfort.
Significant Climbs (≥3% grade & ≥0.1 miles)
Climb #130: Mile 134.38 to 134.48, 0.10 mi, avg grade 4.69%, total gain 24.9 ft
Climb #131: Mile 134.69 to 134.79, 0.10 mi, avg grade 3.34%, total gain 17.8 ft
Climb #132: Mile 134.89 to 135.19, 0.30 mi, avg grade 4.34%, total gain 69.9 ft
Climb #133: Mile 135.39 to 135.50, 0.10 mi, avg grade 7.08%, total gain 38.2 ft
Climb #134: Mile 135.70 to 135.80, 0.10 mi, avg grade 8.61%, total gain 45.6 ft
Climb #135: Mile 135.90 to 136.10, 0.20 mi, avg grade 5.57%, total gain 59.5 ft
Climb #136: Mile 136.31 to 136.61, 0.31 mi, avg grade 4.82%, total gain 77.9 ft
Climb #137: Mile 136.71 to 136.81, 0.10 mi, avg grade 3.53%, total gain 18.8 ft
Climb #138: Mile 138.34 to 138.44, 0.10 mi, avg grade 7.96%, total gain 42.2 ft
Climb #139: Mile 139.15 to 139.45, 0.30 mi, avg grade 3.76%, total gain 60.1 ft
Climb #140: Mile 139.65 to 139.75, 0.10 mi, avg grade 3.04%, total gain 16.3 ft
Climb #141: Mile 139.96 to 140.26, 0.30 mi, avg grade 3.67%, total gain 58.8 ft
Climb #142: Mile 140.77 to 140.87, 0.10 mi, avg grade 3.34%, total gain 18.1 ft
Climb #143: Mile 140.98 to 141.08, 0.10 mi, avg grade 4.40%, total gain 23.5 ft
Climb #144: Mile 141.38 to 141.48, 0.10 mi, avg grade 4.86%, total gain 26.2 ft
Climb #145: Mile 141.79 to 141.99, 0.21 mi, avg grade 4.10%, total gain 44.5 ft
Climb #146: Mile 143.11 to 143.31, 0.20 mi, avg grade 4.41%, total gain 47.4 ft
Climb #147: Mile 143.62 to 143.73, 0.10 mi, avg grade 3.78%, total gain 20.6 ft
Climb #148: Mile 143.93 to 144.13, 0.20 mi, avg grade 4.81%, total gain 51.6 ft
Climb #149: Mile 145.15 to 145.25, 0.10 mi, avg grade 3.02%, total gain 16.0 ft
Climb #150: Mile 145.96 to 146.06, 0.10 mi, avg grade 3.79%, total gain 20.2 ft
Climb #151: Mile 146.16 to 146.36, 0.20 mi, avg grade 4.94%, total gain 53.3 ft
Climb #152: Mile 146.67 to 146.77, 0.10 mi, avg grade 4.16%, total gain 22.1 ft
Significant Descents (≤-3% grade & ≥0.1 miles)
Descent #115: Mile 137.63 to 137.93, 0.30 mi, avg grade -5.12%, total drop 82.3 ft
Descent #116: Mile 138.03 to 138.23, 0.20 mi, avg grade -7.95%, total drop 85.2 ft
Descent #117: Mile 138.44 to 138.74, 0.31 mi, avg grade -5.07%, total drop 81.7 ft
Descent #118: Mile 138.84 to 139.05, 0.20 mi, avg grade -4.39%, total drop 47.4 ft
Descent #119: Mile 141.69 to 141.79, 0.10 mi, avg grade -4.28%, total drop 22.6 ft
Descent #120: Mile 142.09 to 142.20, 0.10 mi, avg grade -5.80%, total drop 31.4 ft
Descent #121: Mile 144.34 to 144.54, 0.20 mi, avg grade -8.78%, total drop 94.6 ft
Descent #122: Mile 145.25 to 145.35, 0.10 mi, avg grade -3.18%, total drop 17.0 ft
Descent #123: Mile 146.47 to 146.57, 0.10 mi, avg grade -3.05%, total drop 16.7 ft
Aid Stations
Deer Pass Trailhead Aid Station (Mile 147.2):
Cutoff Time: 5/8/25 4:45 a.m.
Crew Access: Yes
Pacer Access: No
Drop Bags: No
Gear Check: No
Sleep Station: No
Medic: Yes
Special Menu: Hot dogs, soup, Turkey/cheese/hummus/avocado sandwiches, Fruit, Pancakes
Points of Interest
Dead Horse Ranch State Park (Start): Leaving the aid station and Dead Horse Ranch.
Lower Raptor Trail (Mile ~134-138): Navigate rocky single-track within a "no passing zone" designed to protect the endangered Arizona Primrose.
Lime Kiln Trail (Mile ~138 onwards): Transition onto the high-quality single-track of Lime Kiln Trail, offering increasing red rock views leading to Deer Pass Aid Station.
Miles 147-161 (Sedona Red Rocks to Sedona Posse Grounds Aid Station)
This section is often cited as a "staff pick for favorite of the entire course," promising world-class single-track trails and awe-inspiring red rock scenery.
Continuing on Lime Kiln Trail after Deer Pass Aid Station, the course quickly immerses you in Sedona's iconic red rock landscape. Expect numerous turns and trail junctions as you navigate through this world-renowned trail network, making GPS navigation essential to stay on course.
The route weaves through the Schuerman Mountain Trail and Ridge Trail, offering breathtaking vistas, particularly of the majestic Cathedral Rock. A water station at Red Rock High School provides a crucial hydration opportunity.
The final approach to Sedona Posse Grounds Aid Station includes a brief neighborhood section and pavement running, culminating in a centrally located aid station with full crew and pacer access, drop bags, and indoor sleeping.
While celebrated for its beauty, this section can also be brutally hot, especially during midday, demanding careful heat management.


Key Challenges
Complex Navigation in Sedona's Trail Network: Navigating through Sedona's extensive and intricate trail system, with numerous turns and trail junctions, requires constant attention to GPS and course markings to avoid wrong turns.
Extreme Heat Potential in Sedona: Sedona can experience brutally hot conditions, particularly during midday hours. Effective heat management and consistent hydration are critical to prevent overheating in this exposed and stunning landscape.
Technical Sedona Single-Track: While visually stunning, the single-track trails in Sedona can be technically demanding, featuring rocky sections and challenging footing that requires focus and agility, even with fatigue setting in.
Significant Climbs (≥3% grade & ≥0.1 miles)
Climb #153: Mile 147.18 to 147.28, 0.10 mi, avg grade 6.33%, total gain 33.5 ft
Climb #154: Mile 149.53 to 150.04, 0.51 mi, avg grade 6.12%, total gain 165.4 ft
Climb #155: Mile 150.24 to 150.34, 0.10 mi, avg grade 4.33%, total gain 23.2 ft
Climb #156: Mile 150.65 to 151.05, 0.40 mi, avg grade 8.22%, total gain 175.7 ft
Climb #157: Mile 151.26 to 152.18, 0.93 mi, avg grade 10.19%, total gain 498.1 ft
Climb #158: Mile 152.69 to 153.20, 0.51 mi, avg grade 6.19%, total gain 166.4 ft
Climb #159: Mile 155.83 to 155.93, 0.10 mi, avg grade 5.52%, total gain 29.4 ft
Climb #160: Mile 156.34 to 157.24, 0.91 mi, avg grade 7.92%, total gain 379.0 ft
Climb #161: Mile 158.05 to 158.15, 0.10 mi, avg grade 6.14%, total gain 32.6 ft
Climb #162: Mile 158.76 to 159.16, 0.40 mi, avg grade 8.53%, total gain 182.5 ft
Climb #163: Mile 159.57 to 159.67, 0.10 mi, avg grade 3.79%, total gain 20.2 ft
Significant Descents (≤-3% grade & ≥0.1 miles)
Descent #124: Mile 148.30 to 148.61, 0.31 mi, avg grade -5.10%, total drop 83.1 ft
Descent #125: Mile 148.81 to 149.12, 0.30 mi, avg grade -4.06%, total drop 64.6 ft
Descent #126: Mile 149.32 to 149.53, 0.20 mi, avg grade -3.55%, total drop 37.8 ft
Descent #127: Mile 150.04 to 150.14, 0.10 mi, avg grade -6.22%, total drop 33.9 ft
Descent #128: Mile 150.34 to 150.45, 0.10 mi, avg grade -4.10%, total drop 22.5 ft
Descent #129: Mile 151.05 to 151.15, 0.10 mi, avg grade -8.89%, total drop 46.9 ft
Descent #130: Mile 152.49 to 152.59, 0.10 mi, avg grade -4.77%, total drop 25.5 ft
Descent #131: Mile 153.20 to 153.61, 0.41 mi, avg grade -13.60%, total drop 291.1 ft
Descent #132: Mile 153.71 to 154.52, 0.81 mi, avg grade -5.99%, total drop 255.2 ft
Descent #133: Mile 154.72 to 154.82, 0.10 mi, avg grade -5.58%, total drop 29.5 ft
Descent #134: Mile 154.92 to 155.12, 0.20 mi, avg grade -4.49%, total drop 47.8 ft
Descent #135: Mile 156.13 to 156.34, 0.20 mi, avg grade -4.26%, total drop 45.6 ft
Descent #136: Mile 157.44 to 157.95, 0.50 mi, avg grade -7.14%, total drop 190.3 ft
Descent #137: Mile 159.16 to 159.37, 0.20 mi, avg grade -12.68%, total drop 136.5 ft
Aid Stations
Water Station (Mile 153.9):
Offerings: 1 liter per person only
Sedona Posse Grounds Aid Station (Mile 161.5):
Cutoff Time: 5/8/25 12:00 p.m.
Crew Access: Yes
Pacer Access: Yes
Drop Bags: Yes
Gear Check: Yes
Sleep Station: Yes - Indoor cots (Heated space)
Medic: Yes
Special Menu: Burgers, scrambled eggs, tofu, bacon, pancakes
Points of Interest
Deer Pass Road Culvert (Mile ~147): Pass through a culvert under Hwy 89A, a notable course feature.
Red Rock Loop Road (Mile ~151 & ~153): Cross paved Red Rock Loop Road at two points, requiring attention to traffic.
Red Rock High School (Mile ~153): A landmark and location of a water station, offering a chance to refuel.
Cathedral Rock: Iconic Sedona red rock formation, keep an eye out for stunning views of Cathedral Rock, especially from the Ridge Trail.
Ridge Trail (Mile ~156-158): Run along the Ridge Trail, known for its exceptional views of Cathedral Rock and surrounding red rock formations.
Sedona Posse Grounds Park (Mile 161.5): Arrive at Sedona Posse Grounds Park, a major aid station in Sedona with full services and amenities.
Miles 161-176 (Sedona Singletrack & Schnebly Hill Climb to Foxboro Ranch Aid Station)
Leaving Sedona Posse Grounds Aid Station, this section continues to showcase Sedona's world-class single-track trails before embarking on a significant climb to Foxboro Ranch Aid Station.
The course initially retraces the entry path to the aid station before turning onto the Adobe Jack Trailhead and passing under AZ89A. A series of trails and road crossings leads past the Sedona Ranger Station Aid Station (used for shorter race distances) and under AZ179, running alongside Oak Creek before beginning the ascent up Schnebly Hill Road.
The climb up Schnebly Hill Road starts on pavement before transitioning to a dirt road and the Huckaby-Schnebly Connector trail. This section features the "crown jewel of Sedona single-track," the Hangover Trail, renowned for its breathtaking views of red rock spires like Painted Dome, Teapot, and Merry Go-Round.
Be aware that Hangover Trail can be exposed, potentially intimidating for runners with a fear of heights, and requires careful footing on slickrock traverses. After Hangover Trail, another mile of climbing on Schnebly Hill Road leads to a water station at Mile 170, marking the transition onto the Coconino Plateau and into Ponderosa Pine forests.
The final stretch to Foxboro Ranch Aid Station is a sustained climb on dirt roads, signaling a shift from Sedona's red rocks to the cooler, higher-elevation plateau environment.


Key Challenges
Continued Navigation Demands in Sedona: Numerous turns and trail junctions persist in this Sedona section, requiring ongoing navigational focus and attention to course markings even as fatigue accumulates.
Hangover Trail Exposure and Technicality: Hangover Trail presents both exposure and technical challenges with its slickrock traverses and potentially intimidating heights, especially for runners sensitive to exposure.
Sustained Schnebly Hill Climb: A long and relentless climb up Schnebly Hill Road, transitioning from the heat of the Verde Valley to the higher elevation and cooler temperatures of the Coconino Plateau, will test climbing endurance.
Significant Temperature Swing: Be prepared for a drastic temperature change as you climb Schnebly Hill Road from daytime Sedona heat to potentially much colder nighttime temperatures as you approach Foxboro Ranch on the Coconino Plateau.
Significant Climbs (≥3% grade & ≥0.1 miles)
Climb #164: Mile 161.01 to 161.21, 0.20 mi, avg grade 5.78%, total gain 61.3 ft
Climb #165: Mile 163.86 to 163.96, 0.10 mi, avg grade 3.43%, total gain 18.5 ft
Climb #166: Mile 164.06 to 164.58, 0.51 mi, avg grade 6.52%, total gain 176.8 ft
Climb #167: Mile 164.68 to 164.78, 0.10 mi, avg grade 7.44%, total gain 39.3 ft
Climb #168: Mile 164.88 to 165.29, 0.41 mi, avg grade 4.89%, total gain 104.9 ft
Climb #169: Mile 165.80 to 165.91, 0.10 mi, avg grade 6.89%, total gain 37.4 ft
Climb #170: Mile 166.01 to 166.31, 0.30 mi, avg grade 5.42%, total gain 86.9 ft
Climb #171: Mile 166.41 to 166.51, 0.10 mi, avg grade 7.27%, total gain 38.9 ft
Climb #172: Mile 166.72 to 167.02, 0.31 mi, avg grade 7.16%, total gain 115.8 ft
Climb #173: Mile 167.23 to 167.54, 0.31 mi, avg grade 7.49%, total gain 121.8 ft
Climb #174: Mile 167.64 to 167.94, 0.31 mi, avg grade 13.39%, total gain 216.3 ft
Climb #175: Mile 168.66 to 168.76, 0.10 mi, avg grade 6.92%, total gain 37.8 ft
Climb #176: Mile 169.27 to 169.38, 0.10 mi, avg grade 3.43%, total gain 18.8 ft
Climb #177: Mile 169.48 to 169.58, 0.10 mi, avg grade 3.30%, total gain 17.5 ft
Climb #178: Mile 170.19 to 170.81, 0.62 mi, avg grade 9.55%, total gain 312.2 ft
Climb #179: Mile 171.01 to 172.54, 1.53 mi, avg grade 7.38%, total gain 596.2 ft
Climb #180: Mile 172.64 to 173.15, 0.51 mi, avg grade 4.85%, total gain 129.7 ft
Climb #181: Mile 173.25 to 174.57, 1.32 mi, avg grade 5.32%, total gain 370.3 ft
Climb #182: Mile 175.18 to 175.28, 0.10 mi, avg grade 3.72%, total gain 20.0 ft
Significant Descents (≤-3% grade & ≥0.1 miles)
Descent #138: Mile 161.41 to 161.61, 0.20 mi, avg grade -4.87%, total drop 52.6 ft
Descent #139: Mile 162.13 to 162.43, 0.31 mi, avg grade -3.50%, total drop 56.4 ft
Descent #140: Mile 162.54 to 162.84, 0.31 mi, avg grade -4.30%, total drop 69.3 ft
Descent #141: Mile 162.95 to 163.05, 0.10 mi, avg grade -4.58%, total drop 24.5 ft
Descent #142: Mile 165.29 to 165.39, 0.10 mi, avg grade -7.78%, total drop 42.8 ft
Descent #143: Mile 165.70 to 165.80, 0.10 mi, avg grade -4.53%, total drop 24.4 ft
Descent #144: Mile 168.86 to 169.06, 0.20 mi, avg grade -8.29%, total drop 88.5 ft
Descent #145: Mile 169.68 to 169.88, 0.20 mi, avg grade -7.64%, total drop 82.5 ft
Descent #146: Mile 169.99 to 170.09, 0.10 mi, avg grade -3.83%, total drop 20.8 ft
Descent #147: Mile 174.67 to 174.87, 0.20 mi, avg grade -4.53%, total drop 48.1 ft
Descent #148: Mile 175.58 to 175.99, 0.40 mi, avg grade -6.53%, total drop 138.7 ft
Aid Stations
Water Station (Mile 172.8):
Offerings: 1 liter per person only
Foxboro Ranch Aid Station (Mile 176.7):
Cutoff Time: 5/8/25 9:00 p.m.
Crew Access: Yes
Pacer Access: No Pacer Section
Drop Bags: Yes
Gear Check: No
Sleep Station: No
Medic: Yes
Special Menu: Chili and pasta, Oatmeal
Points of Interest
Adobe Jack Trailhead (Mile ~162): Marks the start of your continued journey through Sedona's single-track trails after leaving pavement.
Oak Creek (Mile ~163-164): Run alongside Oak Creek, enjoying the sounds of water before the Schnebly Hill climb begins.
Schnebly Hill Road: (Mile ~164 onwards): Begin the climb out of Sedona on Schnebly Hill Road, initially paved and then transitioning to dirt.
Huckaby-Schnebly Connector Trail: (Mile ~165): Transition onto the single-track bliss of the Huckaby-Schnebly Connector trail, a highlight of Sedona's trails.
Hangover Trail: (Mile ~166-168): Experience the "crown jewel of Sedona single-track," the Hangover Trail, with its stunning views of red rock formations, but be aware of exposure and technicality.
Coconino Plateau: (Mile ~170 onwards): Transition onto the Coconino Plateau, entering a higher elevation environment characterized by Ponderosa Pine forests.
Foxboro Ranch Aid Station (Mile 176.7): Arrive at Foxboro Ranch Aid Station, marking the start of a no-pacer section through Mexican Spotted Owl habitat.
Miles 176-192 (Coconino Plateau Roads to Munds Park Aid Station)
Leaving Foxboro Ranch Aid Station, the course enters a 16-mile section where pacers are not permitted to minimize impact on the Mexican Spotted Owl's habitat.
This segment marks a significant shift onto the Coconino Plateau, characterized by expansive Ponderosa Pine forests and long stretches of well-graded dirt roads. This relatively runnable terrain offers a chance to "work those legs out and make good time" after the technical Sedona trails and Schnebly Hill climb.
The course passes under I-17 and includes a few turns on dirt roads and sidewalks before reaching Munds Park Aid Station, located behind the Munds Park Community Church. Munds Park Aid Station serves as a sleep station, offering unheated camping tents with cots, and provides crew and pacer access, along with drop bags.
Be mindful of potential vehicle and ATV traffic on the dirt roads in this section, and prepare for cold nighttime temperatures on the plateau.


Key Challenges
No Pacers Allowed: Pacers are prohibited in this section to minimize disturbance to Mexican Spotted Owl habitat, requiring runners to rely on their own resources and mental fortitude.
Vehicle and ATV Traffic on Roads: Be aware of and yield to vehicle and ATV traffic on dirt roads, especially during daylight hours, as these vehicles have right-of-way and may not expect runners.
Nighttime Cold on the Plateau: Prepare for cold nighttime temperatures on the Coconino Plateau, especially if planning to rest or sleep at Munds Park, as nighttime lows can be quite cold.
Navigation Approaching Munds Park: Pay attention to course markings and signage as you approach Munds Park, as there are turns and transitions onto sidewalks to reach the aid station.
Significant Climbs (≥3% grade & ≥0.1 miles)
Climb #183: Mile 176.71 to 176.81, 0.10 mi, avg grade 4.52%, total gain 24.3 ft
Climb #184: Mile 176.91 to 177.01, 0.10 mi, avg grade 3.14%, total gain 17.3 ft
Climb #185: Mile 177.22 to 177.52, 0.31 mi, avg grade 5.04%, total gain 81.6 ft
Climb #186: Mile 179.05 to 179.15, 0.10 mi, avg grade 5.25%, total gain 28.4 ft
Climb #187: Mile 179.25 to 179.56, 0.30 mi, avg grade 4.35%, total gain 69.6 ft
Climb #188: Mile 179.66 to 179.76, 0.10 mi, avg grade 3.22%, total gain 17.0 ft
Climb #189: Mile 180.16 to 180.27, 0.10 mi, avg grade 3.33%, total gain 18.1 ft
Climb #190: Mile 180.67 to 180.77, 0.10 mi, avg grade 3.91%, total gain 21.2 ft
Climb #191: Mile 181.58 to 181.79, 0.21 mi, avg grade 5.02%, total gain 55.2 ft
Climb #192: Mile 181.90 to 182.00, 0.10 mi, avg grade 4.38%, total gain 24.0 ft
Climb #193: Mile 182.10 to 182.21, 0.10 mi, avg grade 3.41%, total gain 18.6 ft
Climb #194: Mile 182.71 to 182.82, 0.10 mi, avg grade 4.74%, total gain 25.6 ft
Climb #195: Mile 183.94 to 184.14, 0.20 mi, avg grade 10.07%, total gain 106.8 ft
Climb #196: Mile 184.45 to 184.65, 0.21 mi, avg grade 7.85%, total gain 85.1 ft
Climb #197: Mile 184.75 to 184.86, 0.10 mi, avg grade 6.96%, total gain 38.0 ft
Climb #198: Mile 185.16 to 185.26, 0.10 mi, avg grade 3.01%, total gain 15.9 ft
Significant Descents (≤-3% grade & ≥0.1 miles)
Descent #149: Mile 176.19 to 176.29, 0.10 mi, avg grade -3.25%, total drop 17.6 ft
Descent #150: Mile 180.98 to 181.28, 0.30 mi, avg grade -6.02%, total drop 96.2 ft
Descent #151: Mile 183.02 to 183.22, 0.21 mi, avg grade -4.84%, total drop 52.5 ft
Descent #152: Mile 185.37 to 185.57, 0.21 mi, avg grade -5.52%, total drop 60.1 ft
Descent #153: Mile 185.78 to 186.40, 0.62 mi, avg grade -7.20%, total drop 236.1 ft
Descent #154: Mile 188.65 to 188.85, 0.20 mi, avg grade -4.81%, total drop 51.8 ft
Descent #155: Mile 189.77 to 190.89, 1.11 mi, avg grade -6.48%, total drop 380.9 ft
Descent #156: Mile 191.09 to 191.19, 0.10 mi, avg grade -4.67%, total drop 25.2 ft
Aid Stations
Munds Park Aid Station (Mile 192.6):
Cutoff Time: 5/9/25 2:45 a.m.
Crew Access: Yes
Pacer Access: Yes
Drop Bags: Yes
Gear Check: Yes
Sleep Station: Yes - Outdoor tents w/ cots (NOT heated)
Medic: Yes
Special Menu: BLT sandwiches, Tomato soup, eggs, tofu, pancakes
Points of Interest
Coconino Plateau (Mile 176 onwards): Enter the high-elevation Coconino Plateau, characterized by Ponderosa Pine forests and cooler temperatures.
I-17 Underpass (Mile ~180 & ~192): The course passes under I-17 twice in this section, serving as a landmark.
Munds Park Community Church (Mile 192.6): The Munds Park Aid Station is located behind the Munds Park Community Church, a notable landmark.
Munds Park: (Mile 192.6): Arrive at Munds Park, a sleep station aid station offering a chance to rest in unheated tents.
Miles 192-205 (Kelly Canyon Trails to Kelly Canyon Aid Station)
Leaving the sleep station at Munds Park Aid Station, pacers are again permitted to join runners.
This approximately 12-mile section features a varied mix of dirt roads and single-track trails within the Kelly Canyon trail system. Navigation requires careful attention to distance-specific signage, as the 250-mile course splits and rejoins the 125-mile course in four separate locations.
Kelly Canyon trails offer diverse surfaces, from soft pine needles to segments of chunky volcanic rock, demanding adaptable footing. Expect numerous turns as the course transitions on and off single-track trails.
Stay vigilant about your location in this section, as runners have been known to drift off course, particularly on longer stretches of seemingly straightforward dirt roads.
Kelly Canyon Aid Station is a "barebones" station with limited services, offering basic aid but no pacers, crew, or drop bag access.


Key Challenges
Complex Navigation and Course Splits: This section features multiple course splits and rejoins with the 125-mile distance, demanding close attention to distance-specific signage to ensure you remain on the correct 250-mile route.
Variable Trail Surfaces: Kelly Canyon trails present a mix of soft pine needles and sections of chunky volcanic rock, requiring runners to adapt their footing and stride to the changing trail surfaces.
Maintaining Focus on Runnable Roads: Long, relatively straight stretches of dirt roads can lead to mental fatigue and drowsiness, potentially increasing the risk of losing focus and going off course if vigilance is not maintained.
Significant Climbs (≥3% grade & ≥0.1 miles)
Climb #199: Mile 192.42 to 192.52, 0.10 mi, avg grade 7.50%, total gain 39.9 ft
Climb #200: Mile 194.25 to 194.35, 0.10 mi, avg grade 3.51%, total gain 18.7 ft
Climb #201: Mile 194.56 to 194.76, 0.20 mi, avg grade 5.97%, total gain 63.8 ft
Climb #202: Mile 195.17 to 195.27, 0.10 mi, avg grade 5.84%, total gain 31.5 ft
Climb #203: Mile 195.78 to 196.19, 0.41 mi, avg grade 4.53%, total gain 97.5 ft
Climb #204: Mile 197.93 to 198.03, 0.10 mi, avg grade 3.20%, total gain 17.6 ft
Climb #205: Mile 198.14 to 198.24, 0.10 mi, avg grade 3.45%, total gain 18.9 ft
Climb #206: Mile 198.34 to 198.45, 0.10 mi, avg grade 4.64%, total gain 25.4 ft
Climb #207: Mile 198.55 to 198.65, 0.10 mi, avg grade 4.96%, total gain 26.5 ft
Climb #208: Mile 198.76 to 199.16, 0.41 mi, avg grade 4.88%, total gain 105.2 ft
Climb #209: Mile 199.58 to 199.78, 0.20 mi, avg grade 4.70%, total gain 50.8 ft
Climb #210: Mile 201.41 to 201.51, 0.10 mi, avg grade 5.53%, total gain 30.2 ft
Significant Descents (≤-3% grade & ≥0.1 miles)
Descent #157: Mile 192.00 to 192.11, 0.10 mi, avg grade -4.76%, total drop 25.7 ft
Descent #158: Mile 196.80 to 196.90, 0.10 mi, avg grade -5.02%, total drop 26.7 ft
Descent #159: Mile 197.00 to 197.11, 0.10 mi, avg grade -3.92%, total drop 21.4 ft
Descent #160: Mile 200.49 to 200.80, 0.31 mi, avg grade -4.17%, total drop 67.6 ft
Descent #161: Mile 201.21 to 201.31, 0.10 mi, avg grade -5.04%, total drop 26.9 ft
Descent #162: Mile 204.17 to 204.28, 0.10 mi, avg grade -3.11%, total drop 16.8 ft
Descent #163: Mile 204.79 to 205.00, 0.20 mi, avg grade -3.88%, total drop 41.3 ft
Aid Stations
Kelly Canyon Aid Station (Mile 205.2):
Cutoff Time: 5/9/25 8:00 a.m.
Crew Access: No
Pacer Access: No
Drop Bags: No
Gear Check: No
Sleep Station: No
Medic: Yes
Special Menu: Chicken burritos, grits
Points of Interest
Kelly Canyon Trails (Mile ~194-205): Explore the forested Kelly Canyon trail system, featuring varied terrain from pine needles to volcanic rock.
Miles 205-213 (Highland Trail & Hwy 89A to Fort Tuthill Aid Station)
From Kelly Canyon Aid Station, the course begins on single-track before transitioning to a well-maintained dirt road (FR700). Immediately after this turn, the 125-mile and 250-mile routes split again, requiring vigilant attention to distance-specific course markings.
The course follows dirt roads before turning onto Old Munds Highway, which eventually reverts to dirt. The 125-mile route rejoins the 250-mile route on Old Munds Highway, and the course passes under I-17 for the final time in the race.
A quick transition back to single-track leads onto the Highland Trail, which rolls gently through undulating terrain towards Fort Tuthill. Crossing Hwy 89A on the Highland Trail demands extreme caution due to fast-moving traffic.
A final right turn off the single-track onto a dirt road leads directly into Fort Tuthill Aid Station. This station offers comprehensive support, including full crew and pacer access, drop bags, and indoor sleeping, and also serves as the start line for the Flagstaff Crest 39 distance race.


Key Challenges
Continuing Route Splits: Remain vigilant for distance-specific signage as route splits and rejoins continue in this section, requiring careful navigation to stay on the 250-mile course.
High Traffic Hwy 89A Crossing: Crossing Hwy 89A on the Highland Trail involves navigating a high-traffic paved highway with fast-moving vehicles; exercise extreme caution at this road crossing.
Plateau Temperatures: Continue to be prepared for potentially cold nighttime temperatures on the Coconino Plateau, especially if arriving at Fort Tuthill Aid Station during the evening or night.
Significant Climbs (≥3% grade & ≥0.1 miles)
Climb #211: Mile 206.92 to 207.02, 0.10 mi, avg grade 3.19%, total gain 17.0 ft
Climb #212: Mile 207.13 to 207.23, 0.10 mi, avg grade 3.08%, total gain 16.7 ft
Climb #213: Mile 208.04 to 208.14, 0.10 mi, avg grade 3.98%, total gain 21.5 ft
Climb #214: Mile 209.57 to 209.67, 0.10 mi, avg grade 3.89%, total gain 21.2 ft
Climb #215: Mile 211.29 to 211.40, 0.10 mi, avg grade 4.59%, total gain 24.7 ft
Climb #216: Mile 212.41 to 212.72, 0.31 mi, avg grade 5.97%, total gain 96.9 ft
Significant Descents (≤-3% grade & ≥0.1 miles)
Descent #164: Mile 205.80 to 206.00, 0.20 mi, avg grade -3.81%, total drop 40.5 ft
Descent #165: Mile 207.53 to 208.04, 0.51 mi, avg grade -5.28%, total drop 140.7 ft
Aid Stations
Fort Tuthill Aid Station (Mile 213.5):
Cutoff Time: 5/9/25 12:45 p.m.
Crew Access: Yes
Pacer Access: **No Pacer Section**
Drop Bags: Yes
Gear Check: Yes
Sleep Station: Yes - Indoor cots (Heated space)
Medic: No
Special Menu: Pasta, salad, bread, oatmeal. Elden Crest Start – Instant Coffee, oatmeal, fruit, bagels
Points of Interest
Old Munds Highway (Mile ~209-213): Experience a section of historic Old Munds Highway.
Highland Trail (Mile ~211 onwards): Enjoy rolling single-track on the Highland Trail as you approach Fort Tuthill.
Fort Tuthill County Park (Mile 213.5): Arrive at Fort Tuthill County Park, home to a major aid station and the start line for the Flagstaff Crest 39 race.
Miles 213-229 (Flagstaff Loop Trail & Walnut Canyon Rim to Walnut Canyon Aid Station)
Leaving Fort Tuthill Aid Station, this section again prohibits pacers to protect dense Mexican Spotted Owl nesting sites. The course merges with runners from the Flagstaff Crest 39 distance race, potentially creating a larger group of runners initially.
After navigating a few turns out of Fort Tuthill Park, the course briefly joins the Soldier Trail before splitting from the 125-mile course and passing under I-17. The route then meanders through cinder running paths around the Flagstaff airport, requiring attention to numerous turns.
Crossing Lake Mary Road and YX Ranch Road, the course joins the Flagstaff Loop Trail and enters Skunk Canyon, where the 39-mile runners diverge. The 250-mile course continues straight, leading to Fisher Point and a scenic viewpoint overlooking Walnut Canyon.
From Fisher Point, the course ascends steeply out of Walnut Canyon and joins the renowned Arizona Trail (AZT), following scenic single-track along the canyon rim for approximately 5 miles. This section offers breathtaking canyon views and a taste of the iconic AZT before arriving at Walnut Canyon Aid Station.


Key Challenges
No Pacers Allowed: Pacers are prohibited in this section to protect Mexican Spotted Owl nesting sites, requiring continued self-reliance.
Navigation Around Flagstaff Airport: Numerous turns through cinder paths surrounding Flagstaff Airport demand careful attention to navigation to avoid going off course in this urban-adjacent environment.
Technical Sections on Walnut Canyon Rim Trail: The AZT section along the rim of Walnut Canyon can feature technical single-track at times, requiring focus and adaptability even in the later stages of the race.
Significant Climbs (≥3% grade & ≥0.1 miles)
Climb #217: Mile 214.85 to 215.05, 0.20 mi, avg grade 3.48%, total gain 37.1 ft
Climb #218: Mile 215.86 to 215.96, 0.10 mi, avg grade 7.43%, total gain 39.7 ft
Climb #219: Mile 216.99 to 217.29, 0.31 mi, avg grade 3.65%, total gain 58.9 ft
Climb #220: Mile 220.66 to 221.08, 0.41 mi, avg grade 9.83%, total gain 214.2 ft
Climb #221: Mile 221.18 to 221.59, 0.41 mi, avg grade 7.73%, total gain 166.7 ft
Climb #222: Mile 223.32 to 223.42, 0.10 mi, avg grade 5.49%, total gain 29.1 ft
Climb #223: Mile 225.24 to 225.34, 0.10 mi, avg grade 3.09%, total gain 16.3 ft
Climb #224: Mile 227.86 to 228.17, 0.30 mi, avg grade 7.85%, total gain 125.1 ft
Significant Descents (≤-3% grade & ≥0.1 miles)
Descent #166: Mile 213.03 to 213.13, 0.10 mi, avg grade -3.72%, total drop 19.7 ft
Descent #167: Mile 214.65 to 214.75, 0.10 mi, avg grade -5.03%, total drop 26.9 ft
Descent #168: Mile 215.46 to 215.56, 0.10 mi, avg grade -3.61%, total drop 19.1 ft
Descent #169: Mile 215.76 to 215.86, 0.10 mi, avg grade -4.01%, total drop 21.2 ft
Descent #170: Mile 215.96 to 216.17, 0.20 mi, avg grade -5.29%, total drop 56.7 ft
Descent #171: Mile 217.39 to 217.49, 0.10 mi, avg grade -6.62%, total drop 35.1 ft
Descent #172: Mile 217.70 to 217.80, 0.10 mi, avg grade -3.45%, total drop 18.9 ft
Descent #173: Mile 219.54 to 219.95, 0.41 mi, avg grade -4.59%, total drop 99.2 ft
Descent #174: Mile 222.81 to 222.91, 0.10 mi, avg grade -3.45%, total drop 18.8 ft
Descent #175: Mile 224.13 to 224.23, 0.10 mi, avg grade -3.05%, total drop 16.1 ft
Descent #176: Mile 224.93 to 225.03, 0.10 mi, avg grade -3.22%, total drop 17.1 ft
Descent #177: Mile 226.34 to 226.44, 0.10 mi, avg grade -5.38%, total drop 28.4 ft
Descent #178: Mile 226.95 to 227.05, 0.10 mi, avg grade -4.64%, total drop 24.7 ft
Descent #179: Mile 227.25 to 227.56, 0.31 mi, avg grade -7.73%, total drop 125.4 ft
Descent #180: Mile 228.27 to 228.37, 0.10 mi, avg grade -6.16%, total drop 33.2 ft
Descent #181: Mile 228.99 to 229.19, 0.20 mi, avg grade -3.82%, total drop 41.0 ft
Aid Stations
Walnut Canyon Aid Station (Mile 229.6):
Cutoff Time: 5/9/25 7:45 p.m.
Crew Access: Yes
Pacer Access: Yes
Drop Bags: Yes
Gear Check: Yes
Sleep Station: No
Medic: Yes
Special Menu: Burritos, Roll-ups (Turkey/cheese/hummus/avo), Potato soup, fruit, Oatmeal
Points of Interest
Flagstaff Loop Trail (Mile ~216 onwards): Navigate wide cinder running paths around Flagstaff Airport, part of the Flagstaff Loop Trail system.
Skunk Canyon (Mile ~225): Reach the Skunk Canyon trail junction where the 39-mile runners split off, continuing on the 250-mile course straight ahead.
Fisher Point (Mile ~228): Arrive at Fisher Point, a viewpoint offering stunning vistas overlooking Walnut Canyon.
Walnut Canyon National Monument (Mile ~228 onwards): Run along the rim of the ancient Walnut Canyon, a protected national monument known for its cliff dwellings.
Arizona Trail (AZT) (Mile ~228 onwards): Join the iconic Arizona Trail (AZT) for a scenic rim trail segment, experiencing a portion of this storied long-distance trail.
Walnut Canyon Aid Station (Mile 229.6): Arrive at Walnut Canyon Aid Station, located near the Walnut Canyon National Monument visitor center.
Miles 229-236 (AZT & Tom Moody Loop to Wildcat Hill Aid Station)
Pacers are once again permitted to join runners as you depart Walnut Canyon Aid Station.
This section initially follows Old Walnut Canyon Road before transitioning to double-track and then back to single-track, crossing under the I-40 culvert.
The course briefly merges onto Historic Route 66, offering a unique moment on this iconic American highway, before turning back onto dirt roads and then rejoining the AZT.
This segment provides views of Wildcat and Sheep Hill cinder cones, remnants of past volcanic activity in the Flagstaff area.
Leaving the AZT, the course enters the Tom Moody Loop Trail, which passes by the Rio de Flag narrows, a waterfall (potentially dry), and petroglyphs left by the Northern Sinagua people, offering a connection to the area's rich indigenous history.
The course exits the Tom Moody Loop at Picture Canyon Trailhead for a short out-and-back section to Wildcat Hill Aid Station, located at the Flagstaff Fire Department Training facility.


Key Challenges
Navigation Through Intersections: Numerous turns and trail junctions in the initial double-track section after leaving Walnut Canyon Aid Station require continued attention to navigation to ensure you stay on course.
Potential for Cold Nights: Even as you approach the finish, nighttime temperatures at this elevation can still be very cold, especially if stopping for any extended period. Be prepared with appropriate layers.
Significant Climbs (≥3% grade & ≥0.1 miles)
Climb #225: Mile 230.42 to 230.52, 0.10 mi, avg grade 3.80%, total gain 20.9 ft
Climb #226: Mile 230.62 to 230.73, 0.10 mi, avg grade 7.14%, total gain 38.7 ft
Climb #227: Mile 232.97 to 233.07, 0.10 mi, avg grade 3.70%, total gain 20.1 ft
Climb #228: Mile 234.61 to 234.92, 0.31 mi, avg grade 3.72%, total gain 60.8 ft
Significant Descents (≤-3% grade & ≥0.1 miles)
Descent #182: Mile 229.60 to 229.70, 0.10 mi, avg grade -4.60%, total drop 24.7 ft
Descent #183: Mile 233.89 to 234.00, 0.10 mi, avg grade -7.84%, total drop 41.6 ft
Descent #184: Mile 235.12 to 235.22, 0.10 mi, avg grade -5.09%, total drop 27.0 ft
Aid Stations
Wildcat Hill Aid Station (Mile 236.5):
Cutoff Time: 5/9/25 10:45 p.m.
Crew Access: Yes
Pacer Access: Yes
Drop Bags: No
Gear Check: Yes
Sleep Station: No
Medic: Yes
Special Menu: Burgers, soup, pancakes, Pete's Meats
Points of Interest
Historic Route 66 (Mile ~232): Experience a brief section on the iconic Historic Route 66, a symbol of American road trip culture.
Wildcat Hill & Sheep Hill Cinder Cones (Mile ~233 onwards): Enjoy views of Wildcat Hill and Sheep Hill cinder cones, volcanic remnants dotting the landscape.
Tom Moody Loop Trail (Mile ~233 onwards): Explore the Tom Moody Loop Trail, passing by the Rio de Flag narrows, a waterfall (seasonal), and ancient petroglyphs.
Picture Canyon Trailhead (Mile 236.5): Exit the Tom Moody Loop at Picture Canyon Trailhead, location of the Wildcat Hill Aid Station.
Miles 236-251 (Mount Elden Ascent & Descent to Trinity Heights Aid Station)
The final major challenge of the Cocodona 250 is the ascent and descent of Mount Elden. Leaving Wildcat Hill Aid Station, the course offers a full frontal view of Mount Elden, your final significant mountain obstacle.
After passing under AZ89A, the course involves navigating numerous trail junctions before merging onto the New Heart trail. This trail provides a surprisingly runnable climb (though likely hike-able at this late stage in the race), ascending less than 500 feet per mile for 4 miles to the ridgeline.
The ridgeline section offers endless views and Aspen groves, providing a rewarding experience after the climb. However, the subsequent descent down Elden Lookout Trail is brutal: a 2,000-foot drop in just 2 miles via 40 steep and technical switchbacks with big steps down.
Reaching the bottom of Elden Mountain, runners join the Forces of Nature trail, navigating a billion social trail junctions before arriving at the final aid station, Trinity Heights. This section is defined by the significant ascent and particularly challenging, technical descent of Mount Elden, the last major hurdle before the finish.


Key Challenges
Substantial Mount Elden Ascent: A significant climb to the ridgeline of Mount Elden in the final stages of the race will test your remaining uphill strength and mental resolve.
Brutal Elden Lookout Trail Descent: The 2,000-foot descent down Elden Lookout Trail is extremely steep and technical, featuring numerous switchbacks and large steps that will be exceptionally taxing on fatigued legs.
Navigation Near Trinity Heights: Navigating the "billion social trail junctions" on the Forces of Nature trail after the Elden descent requires heightened attention to course markings to avoid getting lost so close to the finish.
Extreme Cold on Elden Mountain Summit: Be prepared for potentially extreme cold temperatures on Mount Elden's summit, especially at night, with wind chill potentially dropping below 0°F. Adequate cold-weather gear is essential.
Significant Climbs (≥3% grade & ≥0.1 miles)
Climb #229: Mile 236.13 to 236.23, 0.10 mi, avg grade 3.38%, total gain 17.9 ft
Climb #230: Mile 236.84 to 237.14, 0.30 mi, avg grade 4.52%, total gain 72.6 ft
Climb #231: Mile 237.44 to 237.55, 0.10 mi, avg grade 3.28%, total gain 17.6 ft
Climb #232: Mile 238.26 to 238.36, 0.10 mi, avg grade 3.89%, total gain 21.1 ft
Climb #233: Mile 238.77 to 238.97, 0.20 mi, avg grade 5.92%, total gain 63.8 ft
Climb #234: Mile 239.28 to 239.38, 0.10 mi, avg grade 5.43%, total gain 29.2 ft
Climb #235: Mile 239.48 to 240.19, 0.71 mi, avg grade 5.92%, total gain 222.1 ft
Climb #236: Mile 241.00 to 241.31, 0.31 mi, avg grade 6.59%, total gain 107.0 ft
Climb #237: Mile 241.61 to 243.35, 1.74 mi, avg grade 7.98%, total gain 733.0 ft
Climb #238: Mile 243.46 to 243.56, 0.10 mi, avg grade 8.58%, total gain 46.3 ft
Climb #239: Mile 243.66 to 245.20, 1.54 mi, avg grade 8.34%, total gain 676.6 ft
Climb #240: Mile 245.40 to 245.70, 0.30 mi, avg grade 11.66%, total gain 187.7 ft
Climb #241: Mile 246.21 to 246.63, 0.41 mi, avg grade 10.40%, total gain 225.8 ft
Climb #242: Mile 249.39 to 249.60, 0.21 mi, avg grade 4.59%, total gain 50.4 ft
Climb #243: Mile 249.70 to 249.91, 0.20 mi, avg grade 7.79%, total gain 84.2 ft
Climb #244: Mile 250.01 to 250.31, 0.30 mi, avg grade 4.98%, total gain 79.3 ft
Climb #245: Mile 250.71 to 250.82, 0.10 mi, avg grade 6.38%, total gain 34.3 ft
Significant Descents (≤-3% grade & ≥0.1 miles)
Descent #185: Mile 236.23 to 236.33, 0.10 mi, avg grade -5.30%, total drop 28.1 ft
Descent #186: Mile 245.91 to 246.11, 0.20 mi, avg grade -6.10%, total drop 64.8 ft
Descent #187: Mile 246.63 to 248.78, 2.15 mi, avg grade -18.93%, total drop 2153.6 ft
Descent #188: Mile 248.88 to 249.19, 0.31 mi, avg grade -8.75%, total drop 141.6 ft
Descent #189: Mile 250.31 to 250.51, 0.20 mi, avg grade -6.47%, total drop 68.7 ft
Descent #190: Mile 250.82 to 251.02, 0.20 mi, avg grade -5.10%, total drop 54.8 ft
Aid Stations
Trinity Heights Aid Station (Mile 255.3):
Cutoff Time: 5/10/25 8:15 a.m.
Crew Access: No
Pacer Access: No
Drop Bags: No
Gear Check: No
Sleep Station: No
Medic: No
Special Menu: Burritos/tacos
Points of Interest
Mount Elden (Mile ~237-248): Face the final major climb and technical descent of the race on Mount Elden.
New Heart Trail (Mile ~241 onwards): Ascend Mount Elden via the well-constructed single-track of the New Heart Trail.
Elden Lookout Trail (Mile ~246 onwards): Prepare for a brutally steep and technical descent from Mount Elden summit on the Elden Lookout Trail, with numerous switchbacks.
Miles 251-255.1 (Final Miles to the Finish at Heritage Square)
The final stretch, less than 4 miles, is a celebratory run to the finish line at Heritage Square in Flagstaff.
Leaving Trinity Heights Aid Station, the course follows the Pipeline Trail and Lower Oldham Trail, leading you into Buffalo Park. Make sure to touch the buffalo statue at the park entrance – a symbolic gesture marking the final approach to the finish.
Transition onto the Switzer Canyon cinder path for a smooth running surface. The last mile is on pavement, following Forest Avenue and Beaver Street, before a final left turn onto Birch Avenue and a right into Cocodona Alley, bringing you to the finish line at Heritage Square.
Embrace these final moments, soak in the atmosphere, and celebrate your incredible achievement of completing the Cocodona 250!


Key Challenges
Mental Fortitude in Final Miles: Maintaining focus and pushing through the final miles after such an extended and demanding race will require significant mental fortitude, even as the finish line is close.
Pavement Finish: The final paved miles, while seemingly easy, can be surprisingly tough on legs that have endured 250 miles of varied terrain. Manage pace and effort on the pavement to avoid any last-minute setbacks.
Significant Climbs (≥3% grade & ≥0.1 miles)
Climb #246: Mile 251.33 to 251.53, 0.20 mi, avg grade 3.13%, total gain 33.7 ft
Climb #247: Mile 252.14 to 252.35, 0.20 mi, avg grade 9.11%, total gain 97.5 ft
Climb #248: Mile 253.79 to 253.89, 0.10 mi, avg grade 4.16%, total gain 22.7 ft
Significant Descents (≤-3% grade & ≥0.1 miles)
Descent #191: Mile 251.73 to 251.94, 0.20 mi, avg grade -6.91%, total drop 74.7 ft
Descent #192: Mile 253.07 to 253.38, 0.31 mi, avg grade -5.79%, total drop 94.7 ft
Descent #193: Mile 254.10 to 254.20, 0.10 mi, avg grade -8.62%, total drop 46.8 ft
Descent #194: Mile 254.51 to 254.61, 0.10 mi, avg grade -5.73%, total drop 31.2 ft
Aid Stations
FINISH at Heritage Square (Mile 255.1)
Points of Interest
Buffalo Park (Mile 252.38): Enter Buffalo Park, a large park signifying the final approach to Flagstaff and the finish line.
Buffalo Statue: Be sure to touch the buffalo statue at the entrance of Buffalo Park, a traditional marker for Cocodona finishers.
Heritage Square, Flagstaff (Mile 255.1): Cross the finish line at Heritage Square in downtown Flagstaff, celebrating the culmination of your incredible Cocodona 250 journey.
AI slop.