


The 2025 Austin International Half Course Guide
A Thrilling Downhill-to-Downtown Course

Note: This guide is based on a GPX file created from an interpretation of the official course map. The official course distance is 13.1 miles, which is the shortest possible route while staying within the course boundaries. The GPX file measures the course at 13.18 miles, so distances in the guide are approximate.
Course Overview
The Austin International Half (formerly the 3M Half Marathon) is a point-to-point road half marathon in beautiful Austin, Texas. With a 7:30 AM start just minutes after sunrise, the early miles can feel crisp before temperatures gradually climb to the mid-60s.
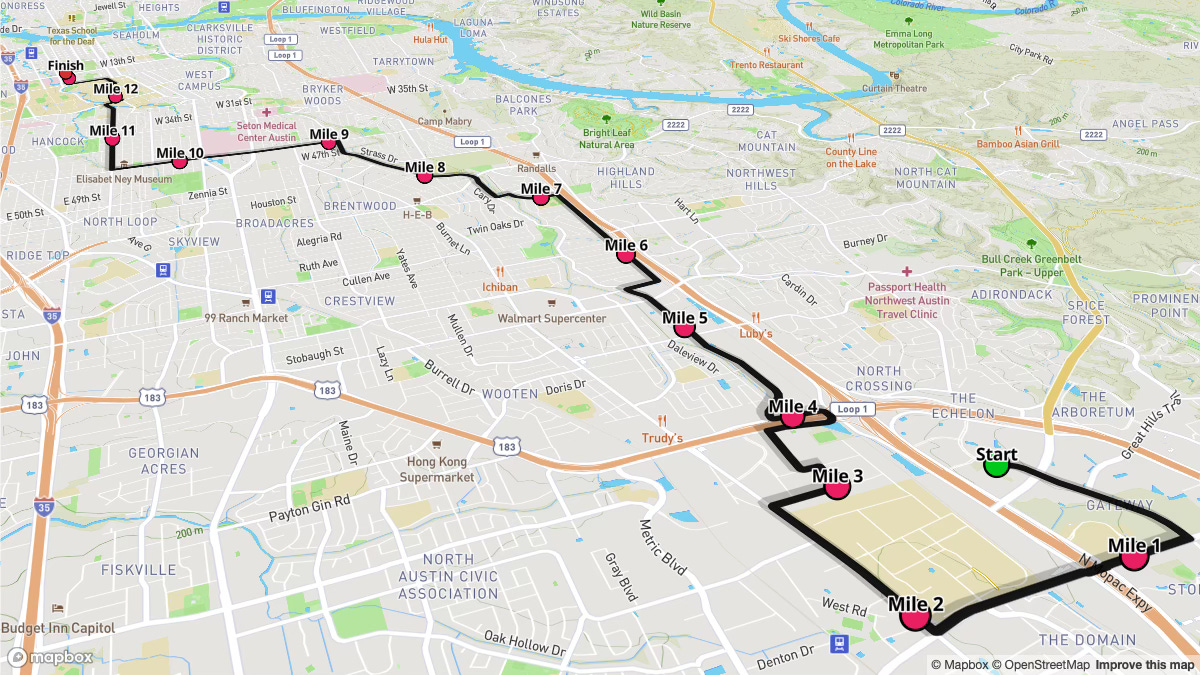
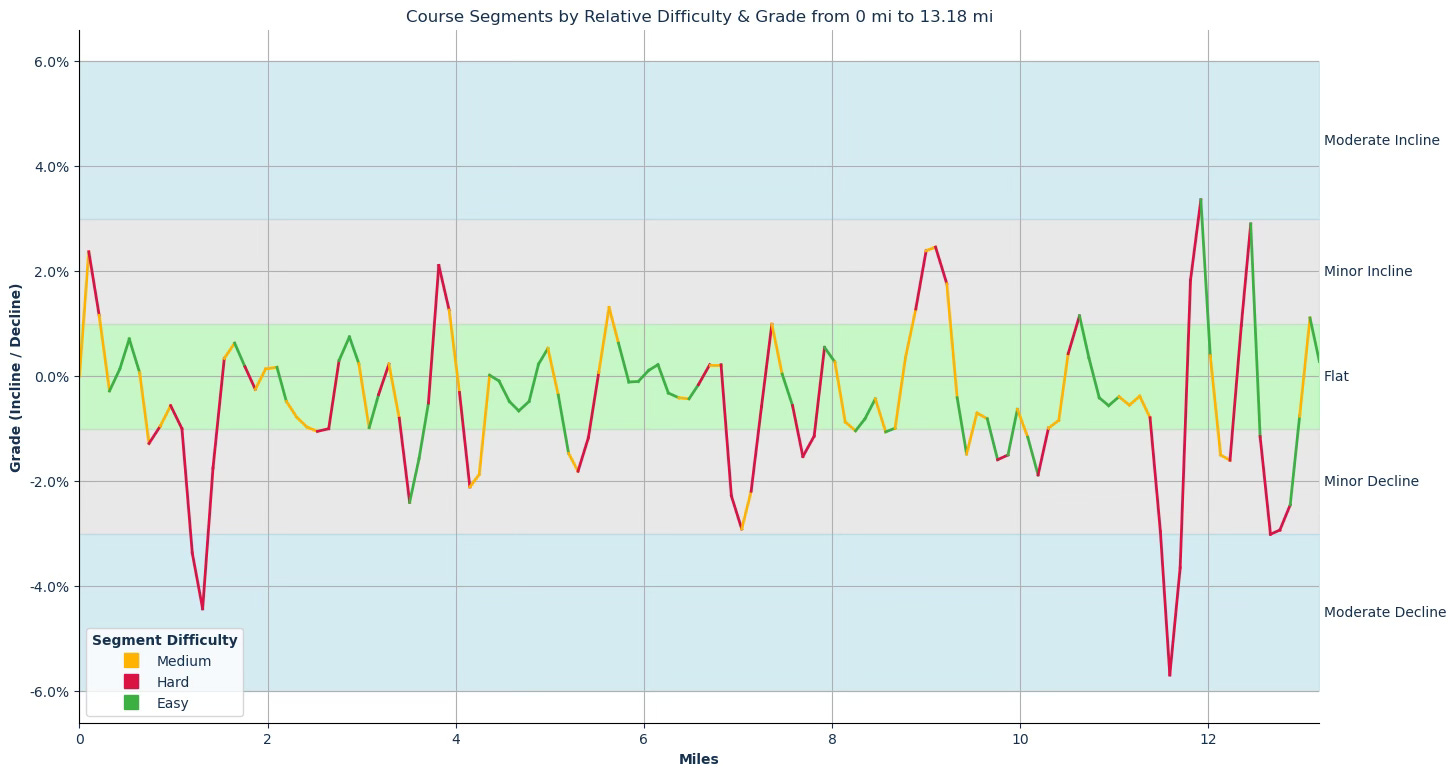
Overall, the route trends downhill—there’s more total descent than ascent—yet expect a few gently rolling sections and a moderate climb in the later miles as you approach downtown Austin. From quiet commercial stretches in North Austin to the buzz of the University area, this course offers a dynamic blend of scenery and terrain.
Key Stats
Event Date: January 19, 2025
Event Type: Road Half Marathon
Course Length: 13.1 miles
Course Type: Point to Point
TrailScore: 19.76
Road Half Marathon Rating: Easy
Total Ascent: 206.23 feet
Total Descent: 531.73 feet
Longest Uphill: Starting at Mile 8.79, 0.55 miles at an average grade of 1.60%
Longest Downhill: Starting at Mile 9.34, 1.21 miles at an average grade of -1.04%
Steepest Uphill: Starting at Mile 11.84, 0.22 miles at an average grade of 2.60%
Steepest Downhill: Starting at Mile 12.61, 0.42 miles at an average grade of -2.47%
Grade Distribution:
Flat: 63.1%
Minor Decline: 21.3%
Minor Incline: 9.8%
Moderate Decline: 4.9%
Moderate Incline: 0.8%
Course Briefing
Miles 0-3.5 (Rolling Start in Northwest Austin)
Overview
You’ll start on Stonelake Boulevard at 7:30 AM with temperatures likely in the low-to-mid 40s. After a short stretch of gentle inclines, the course begins to slope downward—creating an opportunity for an efficient start if you keep your effort controlled. By around Mile 2, you’ll shift toward Burnet Road. Watch your pace, as there are some short downhills in this opening section that can tempt you to go out too fast.


Key Challenges
Minor Inclines Early On: Although generally manageable, the first half-mile includes a few small rollers. Stay relaxed so you don’t overexert.
Short Moderately Steep Declines: West Braker Lane features a couple of moderate declines near Mile 1 to Mile 1.3. Control your turnover so you don’t spike your heart rate.
Aid Stations
Mile 2: BPN Electrolytes, Water, Medical, Restrooms
Mile 3.3: BPN Electrolytes, Water, Medical, Restrooms
Points of Interest & On Course Entertainment
Mile 1 (Austin Taiko): Japanese drumming group energizing runners early.
Mile 2.75 (Everett Wren): Lively fiddle music along Burnet Road.
Mile 3.05 (Inside Out Steel Band): Steel drum performance as you transition from Burnet toward the next stretch.
Miles 3.5-7 (Shoal Creek Descent & Steady Progress)
Overview
After around Mile 3.5, you’ll make your way toward Research Boulevard and eventually onto Shoal Creek Boulevard. There’s a net downhill through this corridor, though it’s interspersed with occasional flat sections. You can use this portion to settle into your goal pace—or slightly faster—while maintaining control.


Key Challenges
Clusters of Minor Declines: Consistent gentle downhills might tempt you to push; be mindful not to neglect fueling and hydration.
Small Bumps: A few flatter or slight-incline stretches break up the descents, so watch for subtle effort shifts.
Aid Stations
Mile 4.8: BPN Electrolytes, Water, Medical, Restrooms
Mile 7: BPN Go Gels, BPN Electrolytes, Water, Medical, Restrooms
Points of Interest & On Course Entertainment
Mile 5 (Kupira Marimba): Zimbabwean marimba tunes to keep your spirits high.
Mile 6.65 (The 4411): Another energy boost from local performers.
Miles 7-10 (Transition Toward UT)
Overview
Approaching Mile 7, you’ll continue along Shoal Creek before heading closer to the University of Texas area. Terrain becomes a bit more varied here, with gentle rollers appearing around Mile 8 through 9.5. You’ll encounter the longest uphill (starting at Mile 8.79) followed by a relatively long downhill afterward. Pacing is essential—stay steady on the incline so you can take advantage of the descent.


Key Challenges
Longest Uphill (Mile 8.79 to 9.34): An average 1.60% grade. Keep your cadence and effort consistent, then prepare for the following downhill.
Series of Minor Declines Afterward: Once you crest, the 1.21-mile downhill can be used for recovery—but avoid over-striding.
Aid Stations
Mile 7.85: BPN Electrolytes, Water, Medical, Restrooms
Mile 9.5: BPN Electrolytes, Water, Medical, Restrooms
Points of Interest & On Course Entertainment
Mile 9.6 (Austin Thaalam): Indian drumming, a lively tempo to help power you through.
Mile 9.84 (Shirley Johnson): Accordion tunes to keep your momentum going.
Miles 10-13.1 (Final Downtown Approach & Finish)
Overview
From Mile 10 onward, you’ll be moving through the UT campus area and toward downtown Austin. There are a few noticeable inclines around Mile 11.8 (the steepest uphill), so manage your effort. After you crest, the final mile trends downward, with a steeper drop near Mile 12.6. Once you turn onto San Jacinto Boulevard and see the city center, focus on a strong finish.


Key Challenges
Steepest Uphill (Mile 11.84 to 12.06): A short but moderately pitched climb at 2.60% grade. Keep your form upright and push over the top.
Final Descent (Around Mile 12.61): A moderate decline of -2.47% that provides momentum for a final kick.
Aid Stations
Mile 11: BPN Electrolytes, Water, Medical, Restrooms
Mile 11.65: BPN Electrolytes, Water, Medical, Restrooms
Points of Interest & On Course Entertainment
Mile 10.25 (Brian MacLeod): Music to break up the final stretch.
Mile 11.6 (Woode Wood): Guitar and harmonica welcoming you into that uphill push.
Mile 12.3 (Stove Top Rangers): A spirited string ensemble for motivation in the closing mile.
Around Mile 12.4 - 12.6: Bullock Texas State History Museum and other nearby landmarks—let the city’s sights propel you forward.